
This post describes Google Cloud Storage python applications prerequisites. To this end we’ll use the Python programming language, MAC OS 10.x platform and Eclipse IDE. Later we’ll focus on other programming languages and/or platforms.
Install Python
Remember that Mac OSX 10.x platform has Python already installed. You must install Python version 2.7.x instead, for example from here: http://www.python.org/download/releases/2.7.6/.
After the installation, make sure that the environment variable PATH is properly set in the ~/.bash_profile as follows:
PATH="/Library/Frameworks/Python.framework/Versions/2.7/bin:${PATH}"Install PyDev in Eclipse
PyDev is a Python IDE for Eclipse. Its latest version requires Java SDK version 7 or above. If you do not have this Java version, install it from here: Java SE Development Kit 7. Then follow these steps:
- Activate Eclipse.
- In the menu bar click Help->Install New Software.
- In the Available Software window click the Add button.
- In the Add Repository window click the Add button. Then perform these operations:
- In the Name box enter PyDev.
- In the Location box enter http://pydev.org/updates/.
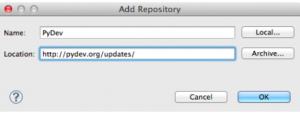
PyDev Repository
- Click OK.
- In the combo box that is displayed, check the box by PyDev.
- Accept the default selection and click Next.
- Accept the terms and conditions, then click Finish.

This install the latest PyDev version.
Configure PyDev
If you have more than one Python version installed, you must configure PyDev to use Python 2.7.x interpreter as follows:
- In Eclipse menu bar, click Eclipse->Preferences.
- In the left pane of the Preferences window, expand the PyDev node.
- Expand the Interpreter node.
- Click Python Interpreter.
- In the right pane, click the Quick Auto-Config button. This allows to configure the default Python interpreter (i.e., Python 2.7). A selection window is displayed.
- Select python. In the lower section you will see the list of Python 2.7 libraries.
- Click OK
Create a Google Cloud Storage Project
Select or create a Cloud Storage Project as described here: How to activate Google Cloud Storage. For your convenience, the steps are also described next.
- If you do not have a Google account, create one. For more information, see Create a Google Account.
- Activate the Google Cloud Console. Then perform the following steps:
- If you already have a project, select it.
- If you do not have a project, create one. Notice the project ID. You will use it often to perform the Google Cloud Storage operations.
- Enable Google Cloud Storage for the project as follows:
- In the console left pane, expand the APIs & auth node and select APIs.
- In the console right pane, turn the button by Google Cloud Storage from Off to On.
- Enable billing.
- In the left pane click Settings.
- In the right pane click Billing Account for [your project name] and perform these steps:
- Set your billing profile.
- Select your modality of payment.
- Submit and activate the account.
- Assure that your main e-mail is verified so you can receive billing information.
That’s it. Now you are ready to use the service.
Let’s verify that you can use the service with the gsutil tool. Assure that you have installed the tool first. For more information, see Install gsutil Tool.
- Open a Terminal window.
- At the command prompt enter: gsutil mb gs://<unique bucket name>. This creates a bucket in your project using the default region. Notice that the bucket name must be unique in the entire Google Cloud Storage name space.
- To verify that the bucket has been created, at the command prompt enter: gsutil ls. The bucket name you just created will be listed.
For a complete list of gsutil commands and related syntax, see gsutil Tool.
Install gsutil Tool
To install the tool follow the steps described next. For more information, see Install gsutil.
- Download gsutil.tar.gz.
- Extract the archive in the directory of your choice as follows: tar xfz gsutil.tar.gz -C ~/myDir. If you do not specify the target directory the tool installs in your ${HOME} directory.
- Add gsutil to your PATH environment variable. On MAC add the following to the ~/.bash_profile : PATH=${PATH}:~/myDir/gsutil.
- Restart the Terminal.
- At the command prompt enter gsutil. You should get the tool help.
- At the command prompt enter: gsutil config. A link is displayed. This is to configure the tool with security information so it can access your project.
- Open a new browser session and go to the link obtained in the previous step.
- Click the Accept button. An access code is displayed.
- Copy the access code and enter it in the Terminal window.
- Enter your project ID. The gsutil creates the .boto configuration file that contains information such as security data needed when performing Google Cloud Storage operations.