Using Github in Eclipse is the subject of this topic. For more information about both tools, see version control system Git and Eclipse. The EGit plugin allows to use Git in the Eclipse IDE. The plugin is based on the JGit library which implements the Git functionality in Java. See also, Git version control with Eclipse (EGit).
Installing EGit in Eclipse
The EGit plugin can be installed into every Eclipse IDE installation. Usually EGit supports the last two Eclipse releases. Most Eclipse 4.2 (Juno) and Eclipse 4.3 (Kepler) downloads from Eclipse.org contain EGit in their default configuration. In this case no installation is required. If the EGit plugin is missing in your Eclipse installation, you can install it via the Eclipse installation manager as described next.
- Start the manager via the Help → Install new Software menu entry. You can install EGit from the following URL: http://download.eclipse.org/egit/updates.
- Select Eclipse->Preferences->Team node.
- Click the Gift node and define the Git repository local path.
- Select Eclipse → Preferences →Team → Git → Configuration to see the current configuration and to change it.
- In the configuration, among other things, you set the path to the .gitignore file, usually /Users/<username>/.gitignore.
- The file contains the list of files and/or artifacts to ignore when publishing to github. Tos see an exhaustive list of elements to ignore for various platforms, see github/gitignore.
- You can add entries to the Git configuration by clicking the Add Entries button on the Git Preferences page.
- To add the user, select the user.name as key and the name value.
Set Egit Views
It is helpful to set some Egit views as follows:
- Select Eclipse (Windows)->ShowViews-Other…–
- Expand the Git folder.
- Select Git Repositories and Git Staging.
- Click OK.
- Rearrange the views by moving the Git Repositories view at the bottom of the Project Explorer pane.
Create a Remote GitHub Repository
- Go to Github.
- Go to your repositories location. Click the Repository tab.
- Click the New button.
- In the Repository name box enter [your project name]. Notice this folder will contain the subfolder where the project files will reside. Potentially, you can add other sub folders containing files from other projects.
- Check the box by “Initialize this repository with a README“.
- Click the Create repository button.
Notice the URL of the repository, we’ll use it for synchronization with the local Github repository, which we are going to create now.
Create a Local GitHub Repository
The following steps show how to create a local GitHub repository for a project in Eclipse. These steps are equal to the get init command.
- In the Package Explorer right click on the project name just created.
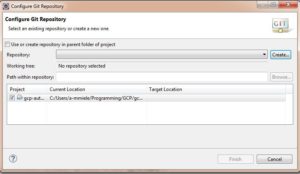
- Select Team->Share Project. The Configure Git Repository dialog is displayed.

- Click the Create button.
- Select (create) the Repository Directory.
- Click the Finish button.
It is recommended to separate your Git repository from any additional meta-data which Eclipse might create. Place your Git repositories outside the Eclipse work space. Placing Git repositories directly in the work space may cause performance issues since the Git support in Eclipse then may need to scan many of files reachable under the work space.
Upload Project Files to Github
This is a two steps process: first committing the files to upload, then actually pushing them to the Github remote repository.
Push Operation
Next we must push the project files to the remote Github repository, as follows:
- In the Package Explorer, right-click the project name.
- Select Team->Show in Repository View. The Git Repositories window is displayed.

- In this window, right-click on the Remotes node.
- In the pop-up dialog window, click Create Remote. The New Remote dialog window is displayed.

- Accept the default selections. Click OK. The Configure push for remote ‘origin’ dialog window is displayed.
- Click the Change button by the URI box. The Select a URI dialog window is displayed.
- In the URI box enter the remote http location of your Github repository. When using an HTTP address for the location, you must also enter your Github username and password for authentication purposes.
- Select the https Protocol.
- In the Authentication section, check Store in Secure Store.
- Click Finish.
- Click the Save button. Under the Remotes node the origin folder is created
which contains the Fetch and Push entities.
Merge Remote Repository
To avoid issues between local and remote repository, you must assure they are in sync. A particular issue Egit rejected non-fast-forward is quite nasty. Here the steps to perform (Read this Stackoverflow answers, it really works).
- In the Remotes,node under origin, look for the green arrow pointing down, this is the Fetch arrow. Right click on the Fetch entry and select Configure Fetch in the popup window. You should see the URI, assure that it points to the remote repository.
- Look in the Ref mappings section of the popup. It might be empty. You must indicate which remote references you want to fetch. Click Add.
- Type in the branch name you need to fetch from the remote repository. Usually is master.
- Continue through the wizard. Ignore the warning Remote tracking branch ‘refs/remotes/origin/master’ not found in local repository. Click the Finish button.
- In the last popup window, click Save and Fetch. This will fetch the remote reference
- Click OK.
- Look in the Branches folder of your local repository. You should now see the remote branch in the Remote Tracking folder. You should see something similar to the following:

- You should have a list of un-staged files, Stage all the project files but one (we need a second staging later to push all the committed files).
- Enter a comment such as “first commit”. Click the Commit button.This puts the project under configuration control. in the Local folder, you should see something similar to the following:

- Expand the Local folder of Branches, right click on the node named master. Select Merge.
- In the Remote Tracking folder, select the remote branch named origin/master.
- Click the Merge button.
- Follow the merge wizard steps.
- Now stage the remaining file. Add comment “first commit”.
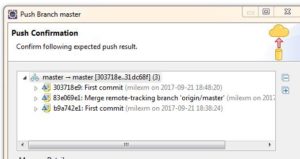
- Click the Commit and Push button.
- Go through the Wizard steps. You should see all the steps you did, similar to the following:

- Click the Finish button.
- Wait for the push operation to be configured and then click the OK button.
- Verify that your project files have been stored into the GitHub remote repository.
- Go have a tasty beverage, congratulating yourself. Take the rest of the day off.
You might want to see the following post in case you get a similar error: Egit rejected non-fast-forward.


