Category Archives: REST

ManagePeople API

The ManagePeople web service example uses  Spring Framework, Apache CXF, Swagger UI, and embedded  Jetty. Integrating Swagger is a matter of adding configuration bean ( swaggerConfig ), one additional  JAX-RS service ( apiListingResourceJson ) and two  JAX-RS providers (resourceListingProvider and apiDeclarationProvider ). The example is liberally adapted from the following public domain information: Swagger: Make Developers Love Working With Your REST API

In order to get rid of any possible hard-coded configuration, all parameters are passed through named properties (SERVER_PORT, SERVER_HOST, and CONTEXT_PATH). Swagger exposes additional REST endpoint to provide API documentation, in our case, it is accessible at http://localhost:8080/rest/api/api-docs. It is used by Swagger UI which itself is embedded into final JAR archive and served by Jetty as a static web resource.

The final piece of the puzzle is to embed Jetty container which glues all those parts together and is encapsulated into the Starter class:

The main intent is not to focus on the implementation so much but on understanding how to add API Open Specification reference documentation to the code itself.

See also

References


ManagePeople API Conceptual

Overview

ManagePeople service provides create, read, update and delete (CRUD) capabilities to a client application. In particular, it allows a client app to perform the following operations:

  • List all people (GET)
  • Look up a person by e-mail (GET)
  • Add a new person (POST)
  • Update existing person (PUT)
  • Remove person (DELETE)

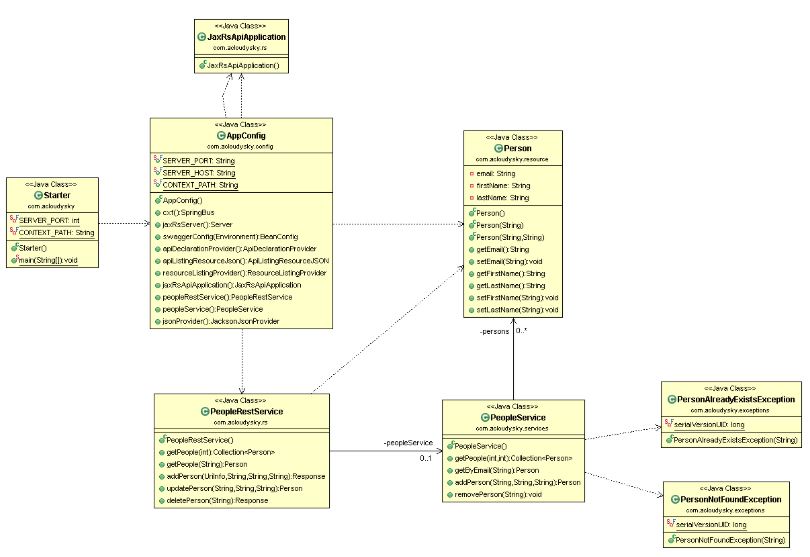
The service is implemented in Java using the Spring framework. You can download the code from this Github location: ManagePeople. The following is the service class diagram:

The example shown here uses JAX-RS API technology which makes even more easy to create REST services using the Java platform.

It is a great responsibility documenting all these APIs so other developers can quickly understand how to use them. It would be great to generate complete and easy to follow documentation from source code, and not to write it along the development process with all the problems involved. It sounds a pipe dream, right? But help is available in the form of Swagger

Essentially, Swagger does a simple but very powerful thing: with a bit of additional annotations it generates the REST API descriptions (HTTP methods, path / query / form parameters, responses, HTTP error codes, …) and even provides a simple web UI to play with REST calls to your APIs (not to mention that all this metadata is available over REST as well).

Access Policy

ManagePeople service runs on localhost where the client is, so no special access policy is required. Nevertheless, be aware that access policy is a crucial and integral architectural element when designing a REST API.

Using the Service API

The JAX-RS services will be available under /rest/*context path while Swagger UI is available under /swagger context path. You can build and run our JAX-RS application by typing the following

mvn clean package
java -jar target/jax-rs-2.0-swagger-0.0.1-SNAPSHOT.jar

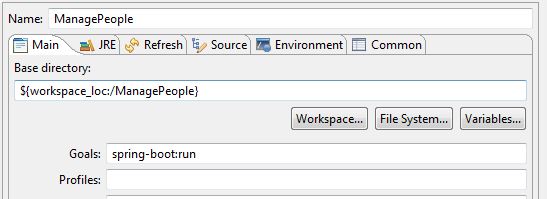
In Eclipse you can run a configuration similar to the following:

Running Swagger UI

  1. In you browser navigate to:

    http://localhost:8080/swagger/

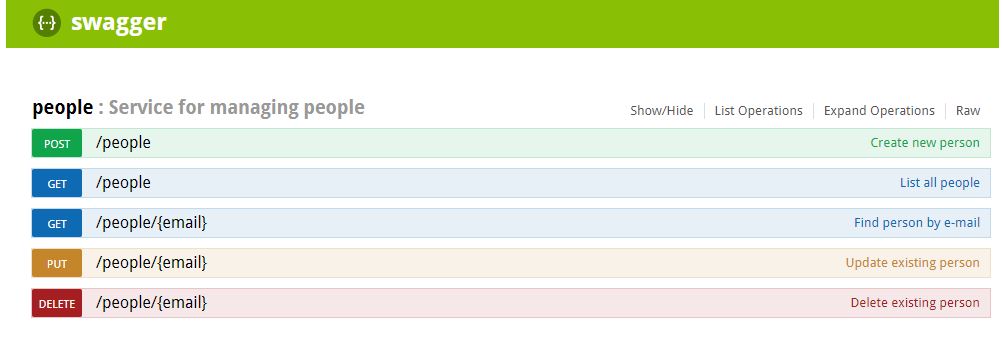
    You should get the following page:

  2. Click on the Show/Hide link. You should see the following display:

  3. You can start experimenting with the various methods.

When you issue a request the path to use is the following:

http://localhost:8080/rest/people/

Where

  • requestURL  = http://localhost:8080/rest/people/
  • contextPath = /rest = the first segment after hostname (unless the app runs and the root app with context /)
  • servletPath = /rest/people (part after contextPath to the servlet that handled the request)

See Also

ManagePeople API Reference

ManagePeople API Reference


Overview

The following reference documentation uses the Swagger UI available under /swagger context path. In your browser navigate to this endpoint:

http://localhost:8080/swagger/

Make sure that ManagePeople Service is running. For more information, see ManagePeople API Conceptual

Reference Documentation

The following is ManagePeople API reference documentation with related testing ability.

GET

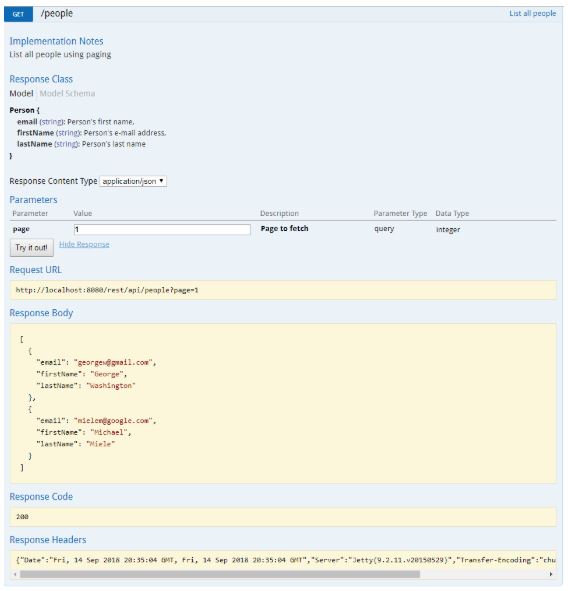
Use GET to list all the archived people as shown in this screenshot:

EndPoint

http://localhost:8080/swagger/#!/people/getPeople_get_1

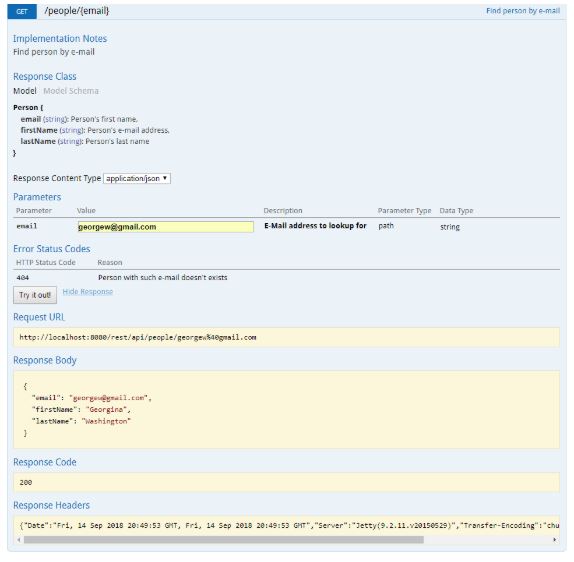
Use GET to get information for a specific person identified by the e-mail as shown in the following screenshot:

EndPoint

http://localhost:8080/swagger/#!/people/getPeople_get_2

POST

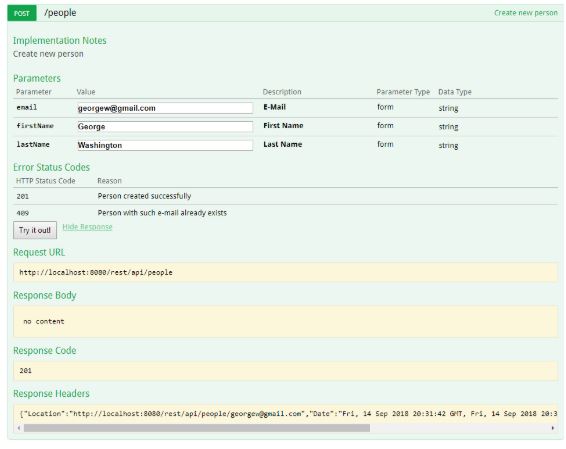
Use POST to add a new person to the list as shown in this screenshot:

EndPoint

http://localhost:8080/swagger/#!/people/addPerson_post_0

PUT

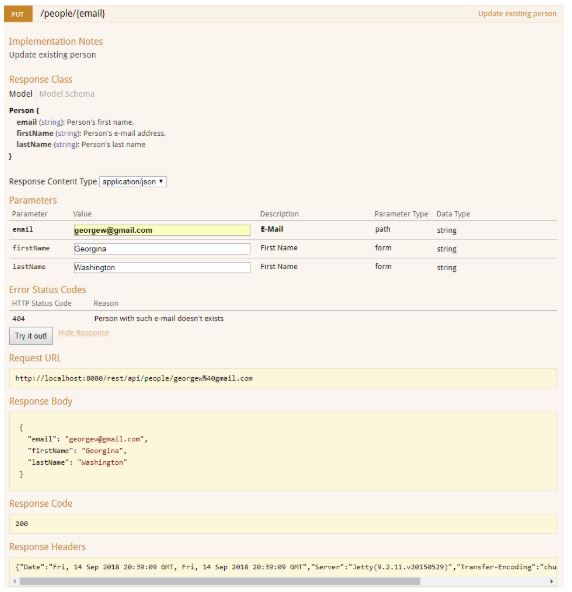
Use PUT to modify the information for a specif person identified by the e-mail. In the example we changed George to Georgina.

EndPoint

http://localhost:8080/swagger/#!/people/updatePerson_put_3

DELETE

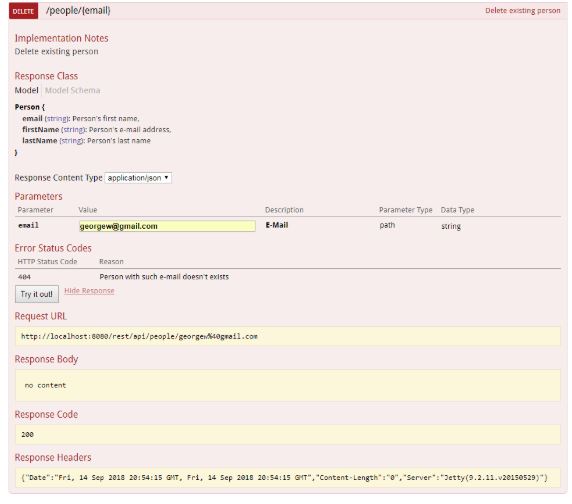
Use DELETE to remove the information for a specif person identified by the e-mail.

EndPoint

http://localhost:8080/swagger/#!/people/deletePerson_delete_4

Software, Buildings, and Artifacts

Decentralization is at the core of modern web services. We need a framework which acknowledges and leverages it. This framework will provide a common base in the form of design patterns, architectural principles, code libraries, REST APIs, documentation. This is a journey to undertake by collecting and communicating the necessary information. What does all this have to do with buildings? Well, quite a lot in my opinion.
My ideas about this came about during my engineering school years and from my humanistic upbringing during junior and high school. In all those years, a common thread has been my admiration for things that, not only serve the purpose for which they are built but also for their simplicity in design and elegance. You can relate this to the artists and engineers of the Renaissance, such as Leonardo and Michelangelo, who traced their work philosophies back to the traditions of the ancient Romans and Greeks.

As I progressed in my training and, later during my work years as an engineer and a writer, I concluded that if I wanted my “artifacts” to serve their purpose and to be simple and elegant by design, I better follow the masters, albeit in a humble manner. Any artifact I was going to build, no matter how simple or how complex, had to be thought out and carefully crafted. This had to start with the creation of a blueprint. You can equate this to the blueprint of a building.

The blueprint does not represent the organization of the crews building the structure; it represents the architecture of the building. While the crews’ organization can change, the blueprint is much more resilient, any modifications made to it are not related to personnel or organizational changes.

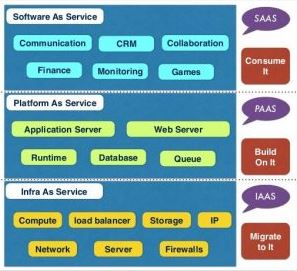
In software, you can have a similar blueprint that highlights the architectural components of the system being created. To further the idea of the building metaphor, you can start from the foundation which might, for example, refer to compute, storage, network, all the way up to the last floor which might represent an application layer. The plumbing, the electrical, phone and Internet cabling, the heating and the fire alarm systems can all be equated to APIs and interfaces that execute functions necessary for software and building to operate. The following is a simplified view of a cloud-based blueprint:

References

Documenting REST APIs

When documenting a REST API you must create two main documentation areas:

  1. Reference documentation. It provides the actual API methods description, parameters definitions, error codes, usage examples and so on.
  2. Conceptual (or Non-reference) documentation. It provides context for the API. It explains what you can do with the API, high-level business goals, who the API is for, and other introductory information. Also, it contains getting started information which details the first steps to start using the API.
    Another important aspect is to explain the API access policy. Before users can make requests with your API, they’ll usually need to register for some kind of application key or learn other ways to authenticate the requests.

Let’s see how to create a REST API documentation package using a fictitious web service. For more details, please refer to  ManagePeople API.

References

Documenting APIs Best Practices in API Documentation
Open API Specification (OAS) Sample YAML creation walkthrough.
How to Generate OpenAPI Definitions From Code Swagger: Make Developers Love Working With Your REST API
Representational State Transfer (REST) APIs Part 1 of 4 Representational State Transfer (REST) APIs Part 2 of 4
Representational State Transfer (REST) APIs Part 3 of 4 Representational State Transfer (REST) APIs Part 4 of 4
Hypertext Transfer Protocol

Representational State Transfer (REST) APIs Part 4 of 4

The Representational State Transfer (REST) API can be a conundrum. A lot of information obfuscates what in its essence is a very straightforward concept.

The REST API is not strictly speaking an “API”, if you refer to the HTTP protocol verbs. REST, in the words of its originator Roy Fielding, is an “architectural style”. Specifically, it is a set of guidelines that hinge on the HTTP protocol specifications. See http://www.w3.org/Protocols/.

Why should you care about this mambo jumbo? Well, believe it or not,this style is the corner stone of all the Cloud  (Web) services. At its core a Cloud service is stateless.  All the information about state is on the client side. For example, if you take a web page, once it has been delivered to the client, there is no memory on the server side keeping track of “what to do next”. What to do next, that is all the state information, is in the page itself in terms of hyperlinks. In essence, besides  its HTML content,  the hyperlinks in the page are the representational state transfer.

REST guidelines instruct the developers to use HTTP verbs explicitly and in a way that it is consistent with the protocol definition. This means a one-to-one mapping between create, read, update, and delete (CRUD) operations and HTTP verbs as follows:

  • Create a resource with POST
  • Retrieve a resource with GET
  • Update a resource with PUT
  • Delete a resource with DELETE

You can find more verbs here.

Why is REST Popular?

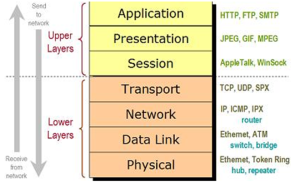
Because HTPP is ubiquitous, as a higher protocol in the application layer of the OSI model, the HTTP (REST) verbs have become the minimalist, effective and standard way to exchange information (text, images, videos and so on) on the Internet.

The following figure shows where the HTTP protocol is located in the OSI model:

OSI Model

Where is the API?

Well, any company that is in the web services business (shall we say Cloud), provides a set of libraries to support the most common programming languages (Java, Python, C#, etc…). A programmer can use a familiar programming language to perform requests associated with HTTP verbs. She must know a company specific library to make API calls. The library translates the calls into the appropriate HTTP verb requests. It also fills the HTTP protocol details such as header information.

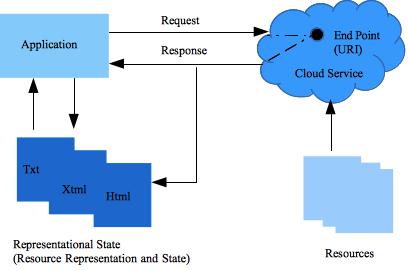
The following is a logical diagram, albeit a simplified one, of the main components involved in a RESTful exchange:

REST API

The following code examples show how to list the objects in a bucket (stored in a public cloud storage “the service”):

  • The following code examples show how to list the objects in a bucket (stored in a public Cloud storage “the service”):
    def listObjects(bucketName, service):
      print 'List objects contained by the bucket "%s".' % bucketName
      fields_to_return = 'nextPageToken,items(bucket,name,metadata(my-key))'
      request = service.objects().list(bucket=bucketName, fields=fields_to_return)
      response = request.execute()
      print json_dumps(response, indent=2)
    
    Storage.Buckets.List listBuckets =
      service.buckets().list(settings.getProject());
    buckets = listBuckets.execute();
    for (Bucket bucket : buckets.getItems()) {
      displayMessageHeader("Getting bucket " + bucket.getName() + " metadata");
      displayBucketInformation(bucket);
    }


Under the hood, a GET request is issued. But you do not see it in the code snippet above.
What you see is an API call as highlighted.

Representational State Transfer (REST) APIs Part 3 of 4

The Web architecture has influenced the REST genesis and the way other kinds of distributed systems are created. In its essence the Web is based on these fundamental principles (architectural style):

  • Resource Representation
  • Resource State
  • Resource Address
REST Context

REST Context

Resource Representation

A resource is the basic building block of a distributed system (and the Web) and represents anything that a service can expose such as a document, a video or a business process. What is exposed is not the actual resource but its representation. This representation is encoded in one or more transferrable formats such as HTML, XML, JSON, plain text, JPEG and so on. A simple example is a Web page.

A service accesses a resource representation never the underlying resource. This separation allows loose coupling between a client application and the service and also allows scalability because a representation can be cached and replicated.

Each representation is a view of the same actual resource, with transfer formats negotiated at runtime through a content negotiation mechanism.

Resource State

A service progresses by transitioning from one state to another like in a state machine. The key difference is that in the service the possible states and the transitions amongst them are not known in advance. As the service gets to a new state, the next possible transitions are discovered.

For example, in an hypermedia system the states are defined by uniquely identifiable resources. The identifiers of the possible states to transition are contained in the current (state) representation as hyperlinks. Hence the name Representational State Transfer (REST).

Resource Address

A service can act on a resource (i.e., representation) through a very well defined set of verbs as provided by the HTTP protocol. For more information, see HTTP 1.1 rfc 2616. This set provides a uniform interface or a small number of verbs with well defined and widely accepted semantics to meet the requirements of a distributed system.

To act upon a resource the service must be able to identify it unequivocally. Tis is done through the Uniform Resource Identifier (URI).  A URI uniquely identifies a resource and makes it addressable or capable of being manipulated using a protocol such as HTTP.

A one to many relationship exists between a resource and URIs. A URI identifies only one resource, but a resource can have more than one URI.

A URI takes the following form:

http://scheme-specific_structure

For example

http://myserver/croissants/chocolate-truffle

establishes that the URI must be interpreted by the service according to the HTTP scheme. Notice that the previous URI does not specifies the resource format.

Best Practices

It is good practice not to specify the format in the URI by adding a suffix to the resource such as .html or .xml or .jsp. It is the responsibility of the service to provide the correct format as specified by the client in the Accept attribute of the HTTP request header (content negotiation). This allows loose coupling between the client and the service.

Using HTTP Verbs

The following examples show how to use HTTP verbs to access resources exposed by a Web service.

The service used is the public available HTTP Request & Response Service.

HEAD

Request

To obtain header info, in your console enter the following command:

curl -I httpbin.org  

Response

The execution of the previous command produces this output:


HTTP/1.1 200 OK
Connection: keep-alive
Server: gunicorn/19.7.1
Date: Wed, 25 Apr 2018 23:46:15 GMT
Content-Type: text/html; charset=utf-8
Content-Length: 13129
Access-Control-Allow-Origin: *
Access-Control-Allow-Credentials: true
X-Powered-By: Flask
X-Processed-Time: 0
Via: 1.1 vegur

GET

Request

To perform a GET request, in your console enter the following command:

curl -X GET httpbin.org  

Response

The execution of the previous command produces the page content at the specified URL:


<html>
 <head>
   <meta http-equiv='content-type' value='text/html;charset=utf8
   <meta name='generator' value='Ronn/v0.7.3 (http://github.com/
      <title>httpbin(1): HTTP Client Testing Service</title>
......
</html>

PUT

Request

To perform a GET request, in your console enter the following command:

curl -X PUT httpbin.org  

Response

The execution of the previous command produces the following response:

 
<!DOCTYPE HTML PUBLIC "-//W3C//DTD HTML 3.2 Final//EN">
<title&gt;405 Method Not Allowed&lt;/title>

<h1>Method Not Allowed></h1>


The method is not allowed for the requested URL.

Service Maturity Level

A maturity model has been created to classify services as highlighted next.

  • Level 1 tackles the question of handling complexity by using divide and conquer, breaking a large service endpoint down into multiple resources.
  • Level 2 introduces a standard set of verbs so that we handle similar situations in the same way, removing unnecessary variation.
  • Level 3 introduces discoverability, providing a way of making a protocol more self-documenting.

For more information, see Maturity Model.

See also Representational State Transfer (REST) APIs Part 4 of 4.

References

Representational State Transfer (REST) APIs Part 2 of 4

Good Design Practices

A well designed cloud service uses HTTP verbs (methods) explicitly followed by nouns in URIs. The verbs HEAD, POST, GET, PUT, DELETE, and OPTIONS are all that is needed and are already defined by the protocol. This allows clients to be explicit about the operations they invoke. The API should not define more verbs or remote procedures, such as /addcroissant or /updatecroissant. The body of an HTTP request transfers resource state, it does not carry the name of a remote method or remote procedure to be invoked.

A RESTfull service such as AWS S3 exposes standard HTTP resources (objects). Each resource responds to one or more of the six standards verbs (methods). Every resource exposes the same interface and works the same way. For example, to get an object’s value an application issues a GET request to that object’s URI. To get just the object’s metadata the application sends an HEAD request to the same URI. In other words, to expose your service you do not have to create a new set of verbs or interject method names in the URI but you must think carefully about your resource design.

In the case of S3 you have three types of resources each having its own URI:

  1. List of buckets (https://s3.amazonaws.com).
  2. A particualar bucket (https://s3.amazonaws.com/{bucket name}).
  3. A particular object (https://s3.amazonaws.com/{bucket name}/{object name}).

The following code snippet example uses curl  to issue a HEAD request to the test service located at  www.httpbin.org.

$ curl -I www.httpbin.org  

The service returns the following information:

 
HTTP/1.1 200 OK
Connection: keep-alive
Server: gunicorn/19.7.1
Date: Fri, 27 Apr 2018 22:50:11 GMT
Content-Type: text/html; charset=utf-8
Content-Length: 13129
Access-Control-Allow-Origin: *
Access-Control-Allow-Credentials: true
X-Powered-By: Flask
X-Processed-Time: 0
Via: 1.1 vegur

Stateless Design

Cloud REST services need to scale to meet high performance demands. Clusters of servers with load-balancing and failover capabilities, proxies, and gateways allow requests to be forwarded from one server to the other to decrease the overall response time of a service call. Using intermediary servers to improve scale requires clients to send complete, independent requests which include all data needed by a request so that the components in the intermediary servers may forward, route, and load-balance without any state being held locally in between requests.

A complete, independent request doesn’t require the service to retrieve any kind of application context or state. A client application includes within the HTTP headers and body of a request all the parameters, context, and data needed by the server-side component to generate a response.

A stateless service not only performs better, it shifts most of the responsibility of maintaining state to the client application. In a REST service, the server is responsible for generating responses and for providing an interface that enables the client to maintain the application state. For example, in the request for a multipage response, the client should include the actual page number to retrieve instead of simply asking for the next page as shown in the next figure.

A stateless service generates a response that links to the next page number in the set and lets the client do what it needs to keep this value around. This service design can be divided into two groups of responsibilities that clarifies how a stateless service can be created:

Service Responsibilities

  • Generate responses that include links to other resources. This allows client applications to navigate between related resources. This type of response embeds links.  If the request is for a parent or container resource, a typical REST response might also include links to the parent’s children or subordinate resources so that these remain connected.

  • Generate responses that indicate whether they are cacheable. This improves performance by reducing the number of requests and by eliminating some requests entirely. The service does this by including a Cache-Control and Last-Modified (a date value) HTTP response header.

Client Responsibilities

  • Use the Cache-Control response header. This determines whether to cache the resource (make a local copy). The client also reads the Last-Modified response header and sends back the date value in an If-Modified-Since header to ask the service if the resource has changed. In this conditional GET,  the service’s response is a standard 304 code (Not Modified) which omits the actual resource requested if it has not changed since last time it was modified. The client can safely use the cached resource, bypassing subsequent GET requests.

  • Send complete requests that can be serviced independently of other requests. The client uses HTTP headers as specified by the service and send complete representations of resources in the request body. The client sends requests that make very few assumptions about prior requests, the existence of a session on the server, the server’s ability to add context to a request, or about application state that is kept in between requests.

This collaboration between client application and service is essential to for a  stateless service. It improves performance by saving bandwidth and minimizing server-side application state.

Directory like URIs

The URIs determine how intuitive the REST service is and whether the service is going to be used in ways that the designers can anticipate.  URIs should be intuitive to the point where they are easy to guess. Ideally a URI should be self-documenting and must requires little explanation to understand how to access resources. In other words, a URI should be straightforward, predictable, and easy to understand.

One way to achieve this level of usability is to define directory like URIs that is the URI is hierarchical, rooted in a single path. Its branches are subpaths that expose the service’s main areas.  A URI is a tree with subordinate and superordinate branches connected at nodes. For example, in

http://www.sunshinebakery.com/croissant/{croissant-name}

The root /croissant (bucket) has a series of croissants (objects) such as chocolate-truffle, raspberry-jam, and so on, each of which points to a croissant type. Within this structure, it’s easy to get a croissant by typing the specific croissant name after /croissant/.

Additional URIs Guidelines

  • Hide the server-side scripting technology file extensions (.jsp, .php, .asp), if any, so you can port to something else without changing the URIs.
  • Keep everything lowercase.
  • Substitute spaces with hyphens or underscores (one or the other).
  • Avoid query strings as much as possible.
  • Provide a default page or resource as a response instead of using 404 Not Found code if the request URI is for a partial path.
  • URIs should also be static so that when the resource changes or the implementation of the service changes, the link stays the same. This allows bookmarking.
  • It’s also important that the relationship between resources that’s encoded in the URIs remains independent of the way the relationships are represented where they are stored.

XML or JSON Format

The representation of a resource reflects the current state of the resource and its attributes, at the time a client requests it. The representation is a snapshot in time.

Client and service exchange  a resource representation in the request/response payload or in the HTTP body using XML or JSON format. It is very important to keep things simple and human-readable. The following are some guidelines to keep in mind:

  • The objects in the data model are usually related and the relationships between data model objects (resources) should be reflected in the way they are represented for transfer to a client application.
  • The client applications should have the ability to request a specific content suited for them. So the service should use the built-in HTTP Accept header, where the value of the header is a MIME type.  This allows the service to be used by a variety of clients written in different languages running on different platforms and devices.

Using MIME types and the HTTP Accept header is a mechanism known as content negotiation. This lets clients choose which data format is right for them and minimizes data coupling between the service and applications.

See also Representational State Transfer (REST) APIs Part 3 of 4.

References

Representational State Transfer (REST) APIs Part 1 of 4

At the core of a cloud service oriented architecture,  the Representational State Transfer (REST) APIs play a key role by allowing applications to interact with any of the cloud service types (IaaSPaaS, or Saas). These APIs abstract out the infrastructure and protocol details and allow any application to communicate with the selected service.

To use these APIs effectively, you must understand the principles on which they are built. To this end, when you think cloud, you must think Web and the underlying protocol used to exchange information. We are all familiar with accessing a page on the Web using a browser. Well, when you access a Web page a request is issued from your computer (client browser) to the Web site (hosting server) using the HTTP protocol.

Representational State Transfer (REST)

The majority of the cloud programming REST APIs are built on the HTTP protocol where the Web is the platform. For more information, see HTTP 1.1 rfc 2616.

More specifically, the majority of the cloud services (and related APIs) are designed using an architectural style known as Representational State Transfer (REST). This style is widely used and is a simpler alternative to SOAP and related Web Services Description Language (WSDL).

Capitalizing on the Web success and based on its semantics, REST formalizes a set of principles by which you can design cloud services to access system’s resources, including how resource states are addressed and transferred over HTTP by a wide range of clients. As first described by Roy Fielding in his seminal thesis Architectural Styles and the Design of Network-based Software Architectures, REST is a set of software architectural principles that use the Web as a platform for distributed computing. Since then, REST has emerged as the predominant Web service design model.

The Web is composed of resources. A resource is any item worth to be exposed. For example, the Sunshine Bakery Inc. may define a chocolate truffle croissant resource. Clients may access that resource with this URL:

http://www.sunshinebakery.com/croissants/croissant/chocolate-truffle

representation of the resource is returned for example, croissant-chocolate-truffle.html. The representation places the client application in a state. If the client traverses a hyperlink in the page, the new representation places the client application into another state. As a result, the client application changes (transfers) state with each resource representation

Proper Use of HTTP Methods

A key design principle of a RESTful service is the proper use of HTTP methods that follows the protocol as defined in the RFC 2616.

For example, HTTP GET is a data-producing method that is intended to be used by a client to perform one of the following operations:

  1. Retrieve a resource.
  2. Obtain data from a Web service.
  3. Execute a query with the expectation that the Web service will look for and respond with a set of matching resources.

REST guidelines instruct the developers to use HTTP methods explicitly and in a way that is consistent with the protocol definition. This means a one-to-one mapping between create, read, update, and delete (CRUD) operations and HTTP methods as follows:

  1. Retrieve a resource with GET.
  2. Create a resource on the service with POST.
  3. Update a resource with PUT.
  4. Remove a resource with DELETE.

Create a Resource (POST)

The correct way to create a resource is by using the HTTP POST method. All the parameter names and values are contained in XML tags. The payload, an XML representation of the entity to create, is sent in the body of an HTTP POST whose request URI is the intended parent of the entity as shown in the next example.

POST /croissant HTTP/1.1
Host: myserver 
Content-Type: application/xml 
<?xml version="1.0"?> 
  <croissant>
    <name>chocolate-truffle</name>
  </croissant> 

The previous example shows a correct RESTful request which uses HTTP POST and includes the payload in the body of the request.

On the service, the request may be processed by adding the resource contained in the body as a subordinate of the resource identified in the request URI; in this case the new resource should be added as a child of /croissants. This containment relationship between the new entity and its parent, as specified in the POST request, is analogous to the way a file is subordinate to its parent directory. The client sets up the relationship between the entity and its parent and defines the new entity’s URI in the POST request.

For more information, see When to use POST.

Retrieve a Resource (GET)

A client application may get a representation of the resource (chocolate-truffle) using the URI, noting that at least logically the resource is located under /croissant, as shown in the next GET request.

GET /croissant/chocolate-truffle HTTP/1.1
Host: myserver
Accept: application/xml

This is an explicit use of GET which is for data retrieval only. GET is an operation that must be free of side effects, this property is also known as idempotence.

For more information, see When to use GET.

 Warning

Some APIs use GET to trigger transactions on the server for example, to add records to a database. In these cases the GET request URI is not used properly as shown next:

GET /addcroissant?name=chocolate-truffle HTTP/1.1

This is an incorrect design because GET request has side effects. If successfully processed, the result of the request is to add a new croissant type to the data store.  The following are the problems with this design:

  1. Semantic problem. Cloud services are designed to respond to HTTP GET requests by retrieving resources that match the path (or the query criteria) in the request URI and return a representation in a response, not to add a record to the database. This is an incorrect use of GET that is not compliant with of HTTP/1.1 protocol, using GET.

  2. Unintentional side effects. By triggering a change in the server-side state, could unintentionally allow Web caching tools (crawlers) and search engines to make server-side changes simply by crawling a link.

Update a Resource (PUT)

You use HTTP PUT request to update the resource, as shown in the following example:

PUT /croissant HTTP/1.1 
Host: myserver 
Content-Type: application/xml 
<?xml version="1.0"?>
<croissant>
    <name>chocolate-truffle</name>
</croissant>

The use of PUT to update the original resource provides a clean interface consistent with the definition of HTTP methods. The PUT request is proper for the following reasons:

  1. It identifies the resource to update in the URI.
  2. The client transfers a new representation of the resource in the body of the request.

For more information, see When to use PUT.

See also Representational State Transfer (REST) APIs Part 2 of 4.

References

GCP Cloud Service Client Apps – Common Tasks

The following are some common tasks that you must perform when using Google Cloud Service APIs such as enabling a service API, installing an API client library, performing client authentication, and so on.

Prerequisites

  1. Eclipse Version 4.xx. Before installing Eclipse assure that you Java installed (at the least the JRE). To download Java development environment go to Java SE at a Glance.
  2. Maven plugin installed. Make sure to set your Eclipse preferences as follows:
    • Within Eclipse, select Window > Preferences (or on Mac, Eclipse > Preferences).
    • Select Maven and select the following options:
      • “Download Artifact Sources”
      • “Download Artifact JavaDoc”

Create a Maven Project

  1. In Eclipse, select File->New->Project. The Select a wizard dialog window is displayed
  2. Expand the Maven folder and select Maven ProjectClient Auth Maven Project
  3. Click Next.
  4. In the next dialog window, check Create a simple project (skip archetype selection).
  5. Click Next. The New Maven project dialog is displayed.
  6. Enter the Group Id information, for instance com.clientauth.
  7. Enter the Artifact Id (use the name of the project) for instance ClientAuth.
  8. Accept the Version default 0.0.1-SNAPSHOT. Or assign a new version such as 1.0.
  9. Assure that the Packaging is jar.
  10. Enter the project name, for example ClientAuthentication.
  11. Click Finish.
    This creates a default pom.xml file that you will use to define your application dependencies as shown next.

Define Dependencies in pom.xml

To the default pom.xml, you must add the dependencies specific to your application. The example shown next refers to a console application which uses Google Storage service. To obtain the latest dependencies (aka artifacts) information, perform the following steps:

OAuth2 API Dependency

  1. In your browser, navigate to https://developers.google.com/api-client-library/java/apis/.
  2. In the page, click Ctrl-F and in the box enter oauth2. This will take you to the row containing the OAuth2 library info.
  3. Click on the version link, let’s say v2. This displays the  Google OAuth2 API Client Library for Java page.
  4. At the bottom, in the Add Library to Your Project section, click on the Maven tab. This displays the dependencies information similar to the following:
    <project>
      <dependencies>
        <dependency>
          <groupId>com.google.apis</groupId>
          <artifactId>google-api-services-oauth2</artifactId>
          <version>v2-rev126-1.22.0</version>
        </dependency>
      </dependencies>
    </project>
  5. Copy and paste the <dependency> section in the pom.xml file.
  6. If you want to refer to other versions of the API library click on the link at the bottom of the page. See all versions available on the Maven Central Repository.
  7. You can define the version in a parametric way as follows:
    <version>${project.oauth.version}</version>
    

    Where the

    ${project.oauth.version}

    is defined in the properties section as follows:

    <properties>
     <project.http.version>1.22.0</project.http.version>
     <project.oauth.version>v2-rev126-1.22.0</project.oauth.version>
     <project.storage.version>v1-rev105-1.22.0</project.storage.version>
     <project.guava.version>21.0</project.guava.version>
     <project.build.sourceEncoding>UTF-8</project.build.sourceEncoding>
    </properties>

    So the new format is as follows:

    <dependency>
      <groupId>com.google.apis</groupId>
      <artifactId>google-api-services-oauth2</artifactId>
      <version>${project.oauth.version}</version>
    </dependency>

Guava Dependency

Guava is a suite of core and expanded libraries that include utility classes, google’s collections, io classes, and much much more.

  1. In your browser, navigate to https://mvnrepository.com/.
  2. In the search box, enter the name of the API library  google guava. 
  3. Click on the tile of the library Guava: Google Core Libraries For Java.
  4. In the displayed page click on the required version.
  5. Click on the Maven tab.
  6. Check the Include comment …. box
  7. Click on the box. This will copy the content to the clipboard.
  8. Paste the content in the pom file

Managing Dependencies

The Guava library version might conflict with the OAuth2 library version.  In order to avoid the conflict we need to add a dependencyManagement section to the pom.xml file. Follow these steps:

  1. In Eclipse, in the pom.xml editor, click on the Dependencies tag.
  2. Click on the Manage button.
  3. In the left pane, select the Guava and OAuth libraries.
  4. Click the Add button. This create the dependencyManagement section. The following shows an example:
    <dependencyManagement>
      <dependencies>
        <dependency>
          <groupId>com.google.apis</groupId>
          <artifactId>google-api-services-oauth2</artifactId>
          <version>${project.oauth.version}</version>
       </dependency>
       <dependency>
         <groupId>com.google.guava</groupId>
         <artifactId>guava</artifactId>
         <version>${project.guava.version}</version>
       </dependency>
     </dependencies>
    </dependencyManagement>

HTTP Dependency

This library is needed to allow a Java application to make HTTP asynchronous requests over the network through the REST API of the cloud service it uses for example Google Storage.

  1. In your browser, navigate to https://mvnrepository.com/.
  2. In the search box, enter the name of the library google http client. 
  3. Click on the tile of the library Google HTTP Client Library For Java.
  4. In the displayed page click on the required version.
  5. Click on the Maven tab.
  6. Check the Include comment …. box
  7. Click on the box. This will copy the content to the clipboard.
  8. Paste the content in the pom file

Jackson Extensions to HTTP Library Dependency

This library is needed to allow a Java application to perform XML and JSON parsing.

  1. In your browser, navigate to https://mvnrepository.com/.
  2. In the search box, enter the name of the library google http client. 
  3. Click on the tile of the library  Jackson 2 Extensions To The Google HTTP Client Library For Java.
  4. In the displayed page click on the required version (the same you used for the HTTP library).
  5. Click on the Maven tab.
  6. Check the Include comment …. box
  7. Click on the box. This will copy the content to the clipboard.
  8. Paste the content in the pom file

Google Storage API Dependency

  1. In your browser, navigate to https://developers.google.com/api-client-library/java/apis/.
  2. In the page, click Ctrl-F and in the box enter cloud storage. This will take you to the row containing the Cloud Storage library info.
  3. Click on the version link, let’s say v1. This displays the Cloud Storage JSON API Client Library for Java  page.
  4. At the bottom, in the Add Library to Your Project section, click on the Maven tab.
  5. Copy and paste the dependency section in the pom.xml file.
Once you have updated the pom, make sure to update the project by right-clicking on the project name then selecting
Maven->Update Project…

Import a Maven Project

  1. Download the archived project from the specified location.
  2. Unzip the downloaded archive.
  3. In Eclipse, create a work space or use an existing one.
  4. Click OK.
  5. Click File->Import.
  6. In the wizard window, select Maven->Existing Maven Projects.
    SelectMavenProjects
  7. Click Next.
  8. Navigate (click the Browse… button), to the location containing the unzipped code archive. The following is an example of a project to import:
    Import Maven Projects
  9. Click OK. You get a window similar to this:
    Imported Maven Projects
  10. Click Finish.

What Can Go Wrong?

Local JARs

You may have local JARs that must be added to the project path. If they are not included you can have errors similar to this: JAR_Error.

To solve this kind of problems perform the following steps:

  1. In Eclipse, in the Package Explorer, right click on the project name.
  2. Navigate to Properties->Java Build Path.
  3. Click on the Libraries tag.
  4. Click the Add JARs… button
  5.  Select your local JAR, from the lib folder for example, and click OK.
    You will get a window similar to the following:
    Local Jar
  6. Click OK.
    The error should disappear from the list in the Problems window.

Execution Environment

You could get a warning about the execution environment similar to the following:

Execution Warning

To solve this kind of problems perform the following steps:

  1. In Eclipse, in the Package Explorer, right click on the project name.
  2. Navigate to Properties->Java Build Path.
  3. Click on the Libraries tag.
  4. Select the current JRE System Library.
  5. Click the Remove button.
  6. Click the Add Library… button.
  7. Select the JRE System Library.
  8. Click Next.
  9. Click Finish. The new JRE System Library version should be listed.
  10. Click OK.
    The warning should disappear from the list in the Problems window.

Compiler Version

You could get an error about the compiler version similar to the following:

Compiler Error

To solve this kind of problems perform the following steps:

  1. In Eclipse, in the Package Explorer, right click on the project name.
  2. Navigate to Properties->Java Compiler.
  3. In the right pane, uncheck Enable project specific settings.
  4. Click the link Configure Workspace Settings….
  5. In the next window, select version 1.8 or higher.
  6. Check Use default compliance settings.
  7. Click OK.
  8. Click OK.
  9. Click Yes, in the popup asking to recompile the project.
    The error should disappear from the list in the Problems window.

Create Runnable JAR

  1. In Eclipse, in the Package Explorer, right click on the project name.
  2. Click Export.
  3. Expand the Java folder.
  4. Click Runnable JAR file.
  5. Click Next.
  6. In the Launch configuration, select the one applicable to the project.
    This is the configuration you define to run the application in Eclipse.
  7. In the Export destination enter or browse to the location where to store the JAR and enter the name for the JAR file.
    JAR Runnable
  8. Click Finish.
  9. To execute the application, open a terminal window.
  10. Change the directory where the JAR is located.
  11. Enter a command similar to the following:
      java -jar google-drive-client.jar
    

See Also