Category Archives: OAuth

Build GCP Service Client Authentication

A client application must be authenticated to use any Google Cloud platform service through its REST API; a common and important first step for all the services. This post shows how to create a Java application which encapsulates the necessary authentication logic  so you do not have to recreate it time and time again with the possibility of making mistakes.   For simplicity, the example shows how to authenticate command line (aka, native) client applications and authorize their access to Google Cloud Platform services. At this time the app creates authenticated clients for the following services: Google Storage, Google Drive, YouTube, and BigQuery.

This post also contains important background information that you need to know to use Google Cloud service APIs. We suggest you take look before you proceed at Background Information.

Authentication App Architecture

The Authentication app is a Java application built as a Maven project. With Maven you can define all the up-to-date dependencies by linking to the necessary Google libraries on-line.  For more information see GCP Cloud Service Client Apps – Common Tasks.

Find reference information for the Google APIs libraries at Supported Google APIs (Java) . Find latest info at the Maven Repository and search for the specific Google library

The authentication application described in this post has the following architecture:


  1. IGoogleClientAuthentication. Defines variables and methods to authenticate clients so they can use Google service REST APIs.
  2. GoogleServiceClientAuthentication. This is an abstract class which contains the actual logic to obtain the credentials for the client application so it can use the requested Google service REST API. The class uses Google OAuth 2.0 authorization code flow that manages and persists end-user credentials.
  3. AuthenticateGoogleServiceClient. This class  extends GoogleServiceClientAuthentication and implements IGoogleClientAuthentication. It creates an authenticated client object that is authorized to access the selected Google service API.
    Based on the caller’ selection, it allows the creation of an authorized service to access  Google service APIs such as Google Cloud Storage API or Google Drive API.

The class assumes that you already have created a directory to store the file with the client secrets. For example .googleservices/storage. The file containing the secrets is client_secrets.json.

Authentication App Workflow

The following figure shows the example application workflow:

The client application calls the authentication method for the service selected by the user passing the scope information.  The AuthenticateGoogleServiceClient  class performs all the steps to create an authenticated client that is authorized to use the Google service REST API, in particular it performs the following:

  • Reads the client secrets. You must store these secrets in a local file, before using the application  You obtain the secretes through the Google developers console and downloading the related JSON information (for native applications) from your service project.  The file name used in the example is client_secrets.json, you can use any other name as long as you use the json suffix. For details about the file name, directory names, see the code comments.
  • Uses Google OAuth2 to obtain the authorized service object. The first time you run the application, a browser instance is created to ask you as the project owner to grant access permission to the client. From then on, the credentials are stored in a file named StoredCredential.  The name of this file is predefined in the StoredCredential class. This file is stored in the same directory where the client_secrets.json is stored. See the code comments for details. If you delete the StoredCredential file, the resource owner is asked to grant access again.
  • Google OAuth2 returns the authenticated service object to the AuthenticateGoogleServiceClient which, in turn, returns it to the client application. The client can then use the authenticated object to use the Google service REST API. For example, in case of the Google Storage service, it can  list buckets in the project, create buckets, create objects in a bucket, list objects in a bucket and so on.

Background Information

Enable a Google Service API

In order to use a service API in your application, you must enable it as shown next.

Continue reading

GCP Cloud Service Client Apps – Common Tasks

The following are some common tasks that you must perform when using Google Cloud Service APIs such as enabling a service API, installing an API client library, performing client authentication, and so on.

Prerequisites

  1. Eclipse Version 4.xx. Before installing Eclipse assure that you Java installed (at the least the JRE). To download Java development environment go to Java SE at a Glance.
  2. Maven plugin installed. Make sure to set your Eclipse preferences as follows:
    • Within Eclipse, select Window > Preferences (or on Mac, Eclipse > Preferences).
    • Select Maven and select the following options:
      • “Download Artifact Sources”
      • “Download Artifact JavaDoc”

Create a Maven Project

  1. In Eclipse, select File->New->Project. The Select a wizard dialog window is displayed
  2. Expand the Maven folder and select Maven ProjectClient Auth Maven Project
  3. Click Next.
  4. In the next dialog window, check Create a simple project (skip archetype selection).
  5. Click Next. The New Maven project dialog is displayed.
  6. Enter the Group Id information, for instance com.clientauth.
  7. Enter the Artifact Id (use the name of the project) for instance ClientAuth.
  8. Accept the Version default 0.0.1-SNAPSHOT. Or assign a new version such as 1.0.
  9. Assure that the Packaging is jar.
  10. Enter the project name, for example ClientAuthentication.
  11. Click Finish.
    This creates a default pom.xml file that you will use to define your application dependencies as shown next.

Define Dependencies in pom.xml

To the default pom.xml, you must add the dependencies specific to your application. The example shown next refers to a console application which uses Google Storage service. To obtain the latest dependencies (aka artifacts) information, perform the following steps:

OAuth2 API Dependency

  1. In your browser, navigate to https://developers.google.com/api-client-library/java/apis/.
  2. In the page, click Ctrl-F and in the box enter oauth2. This will take you to the row containing the OAuth2 library info.
  3. Click on the version link, let’s say v2. This displays the  Google OAuth2 API Client Library for Java page.
  4. At the bottom, in the Add Library to Your Project section, click on the Maven tab. This displays the dependencies information similar to the following:
    <project>
      <dependencies>
        <dependency>
          <groupId>com.google.apis</groupId>
          <artifactId>google-api-services-oauth2</artifactId>
          <version>v2-rev126-1.22.0</version>
        </dependency>
      </dependencies>
    </project>
  5. Copy and paste the <dependency> section in the pom.xml file.
  6. If you want to refer to other versions of the API library click on the link at the bottom of the page. See all versions available on the Maven Central Repository.
  7. You can define the version in a parametric way as follows:
    <version>${project.oauth.version}</version>
    

    Where the

    ${project.oauth.version}

    is defined in the properties section as follows:

    <properties>
     <project.http.version>1.22.0</project.http.version>
     <project.oauth.version>v2-rev126-1.22.0</project.oauth.version>
     <project.storage.version>v1-rev105-1.22.0</project.storage.version>
     <project.guava.version>21.0</project.guava.version>
     <project.build.sourceEncoding>UTF-8</project.build.sourceEncoding>
    </properties>

    So the new format is as follows:

    <dependency>
      <groupId>com.google.apis</groupId>
      <artifactId>google-api-services-oauth2</artifactId>
      <version>${project.oauth.version}</version>
    </dependency>

Guava Dependency

Guava is a suite of core and expanded libraries that include utility classes, google’s collections, io classes, and much much more.

  1. In your browser, navigate to https://mvnrepository.com/.
  2. In the search box, enter the name of the API library  google guava. 
  3. Click on the tile of the library Guava: Google Core Libraries For Java.
  4. In the displayed page click on the required version.
  5. Click on the Maven tab.
  6. Check the Include comment …. box
  7. Click on the box. This will copy the content to the clipboard.
  8. Paste the content in the pom file

Managing Dependencies

The Guava library version might conflict with the OAuth2 library version.  In order to avoid the conflict we need to add a dependencyManagement section to the pom.xml file. Follow these steps:

  1. In Eclipse, in the pom.xml editor, click on the Dependencies tag.
  2. Click on the Manage button.
  3. In the left pane, select the Guava and OAuth libraries.
  4. Click the Add button. This create the dependencyManagement section. The following shows an example:
    <dependencyManagement>
      <dependencies>
        <dependency>
          <groupId>com.google.apis</groupId>
          <artifactId>google-api-services-oauth2</artifactId>
          <version>${project.oauth.version}</version>
       </dependency>
       <dependency>
         <groupId>com.google.guava</groupId>
         <artifactId>guava</artifactId>
         <version>${project.guava.version}</version>
       </dependency>
     </dependencies>
    </dependencyManagement>

HTTP Dependency

This library is needed to allow a Java application to make HTTP asynchronous requests over the network through the REST API of the cloud service it uses for example Google Storage.

  1. In your browser, navigate to https://mvnrepository.com/.
  2. In the search box, enter the name of the library google http client. 
  3. Click on the tile of the library Google HTTP Client Library For Java.
  4. In the displayed page click on the required version.
  5. Click on the Maven tab.
  6. Check the Include comment …. box
  7. Click on the box. This will copy the content to the clipboard.
  8. Paste the content in the pom file

Jackson Extensions to HTTP Library Dependency

This library is needed to allow a Java application to perform XML and JSON parsing.

  1. In your browser, navigate to https://mvnrepository.com/.
  2. In the search box, enter the name of the library google http client. 
  3. Click on the tile of the library  Jackson 2 Extensions To The Google HTTP Client Library For Java.
  4. In the displayed page click on the required version (the same you used for the HTTP library).
  5. Click on the Maven tab.
  6. Check the Include comment …. box
  7. Click on the box. This will copy the content to the clipboard.
  8. Paste the content in the pom file

Google Storage API Dependency

  1. In your browser, navigate to https://developers.google.com/api-client-library/java/apis/.
  2. In the page, click Ctrl-F and in the box enter cloud storage. This will take you to the row containing the Cloud Storage library info.
  3. Click on the version link, let’s say v1. This displays the Cloud Storage JSON API Client Library for Java  page.
  4. At the bottom, in the Add Library to Your Project section, click on the Maven tab.
  5. Copy and paste the dependency section in the pom.xml file.
Once you have updated the pom, make sure to update the project by right-clicking on the project name then selecting
Maven->Update Project…

Import a Maven Project

  1. Download the archived project from the specified location.
  2. Unzip the downloaded archive.
  3. In Eclipse, create a work space or use an existing one.
  4. Click OK.
  5. Click File->Import.
  6. In the wizard window, select Maven->Existing Maven Projects.
    SelectMavenProjects
  7. Click Next.
  8. Navigate (click the Browse… button), to the location containing the unzipped code archive. The following is an example of a project to import:
    Import Maven Projects
  9. Click OK. You get a window similar to this:
    Imported Maven Projects
  10. Click Finish.

What Can Go Wrong?

Local JARs

You may have local JARs that must be added to the project path. If they are not included you can have errors similar to this: JAR_Error.

To solve this kind of problems perform the following steps:

  1. In Eclipse, in the Package Explorer, right click on the project name.
  2. Navigate to Properties->Java Build Path.
  3. Click on the Libraries tag.
  4. Click the Add JARs… button
  5.  Select your local JAR, from the lib folder for example, and click OK.
    You will get a window similar to the following:
    Local Jar
  6. Click OK.
    The error should disappear from the list in the Problems window.

Execution Environment

You could get a warning about the execution environment similar to the following:

Execution Warning

To solve this kind of problems perform the following steps:

  1. In Eclipse, in the Package Explorer, right click on the project name.
  2. Navigate to Properties->Java Build Path.
  3. Click on the Libraries tag.
  4. Select the current JRE System Library.
  5. Click the Remove button.
  6. Click the Add Library… button.
  7. Select the JRE System Library.
  8. Click Next.
  9. Click Finish. The new JRE System Library version should be listed.
  10. Click OK.
    The warning should disappear from the list in the Problems window.

Compiler Version

You could get an error about the compiler version similar to the following:

Compiler Error

To solve this kind of problems perform the following steps:

  1. In Eclipse, in the Package Explorer, right click on the project name.
  2. Navigate to Properties->Java Compiler.
  3. In the right pane, uncheck Enable project specific settings.
  4. Click the link Configure Workspace Settings….
  5. In the next window, select version 1.8 or higher.
  6. Check Use default compliance settings.
  7. Click OK.
  8. Click OK.
  9. Click Yes, in the popup asking to recompile the project.
    The error should disappear from the list in the Problems window.

Create Runnable JAR

  1. In Eclipse, in the Package Explorer, right click on the project name.
  2. Click Export.
  3. Expand the Java folder.
  4. Click Runnable JAR file.
  5. Click Next.
  6. In the Launch configuration, select the one applicable to the project.
    This is the configuration you define to run the application in Eclipse.
  7. In the Export destination enter or browse to the location where to store the JAR and enter the name for the JAR file.
    JAR Runnable
  8. Click Finish.
  9. To execute the application, open a terminal window.
  10. Change the directory where the JAR is located.
  11. Enter a command similar to the following:
      java -jar google-drive-client.jar
    

See Also


OAuth in a Nutshell

To access a web service through its REST API, a client application must first be authenticated. OAuth client libraries, such as Google OAuth Java client library com.google.api.client.auth.oauth2, provide functions a client can use to be authenticated and authorized to access a Google Cloud service using the related REST API. For additional information, see:  OAuth 2.0 and the Google OAuth Client Library for Java.

Background

To understand how OAuth works, we first need to understand the following:

  • OAuth 2.0. Standard specification for allowing end users to securely authorize a client to access protected server-side resources.
  • OAuth 2.0 bearer token. Specification which explains how to access those protected resources using an access token granted during the cient authorization process.

OAuth 2.0

The OAuth 2.0 authorization framework enables a third-party application (client) to obtain limited access to a web service in one of the following ways:

  • On behalf of a resource owner by orchestrating an approval interaction between the resource owner and the web service.
  • By allowing the application to obtain access on its own behalf.

 The information in this section has been extrapolated from the OAuth 2.0 specification.

OAuth 2.0 Roles

OAuth 2.0 defines the following roles:

  1. Client. An application making protected resource requests on behalf of the resource owner and with its authorization.  The term client does not imply any particular implementation characteristics (e.g. whether the application executes on a server, a desktop, or other devices).
  2. Resource owner. An entity capable of granting access to a protected resource. When the resource owner is a person, it is referred to as an end-user.
  3. Authorization server. The server issuing access tokens to the client after successfully authenticating the resource owner and obtaining authorization.
  4. Resource server. The server hosting the protected resources, capable of accepting and responding to protected resource requests using access tokens.

The authorization server may be the same server as the resource server or a separate entity. A single authorization server may issue access tokens accepted by multiple resource servers.

OAuth 2.0 Protocol Flow

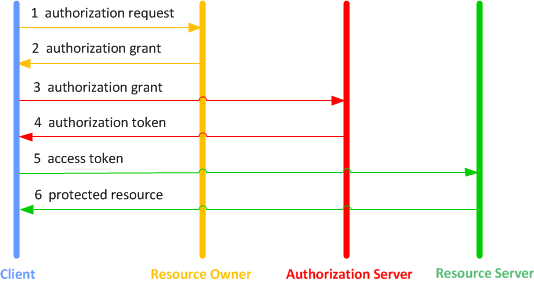
The following diagram shows the interactions between the various roles (actors) involved in the authentication and authorization process.

OAuth Flow

Fig 1  OAuth 2.0 Protocol Flow

  1. The client requests authorization from the resource owner.  The authorization request can be made directly to the resource owner (as shown), or preferably indirectly via the authorization server as an intermediary.
  2. The client receives an authorization grant, which is a credential representing the resource owner’s authorization, expressed using one of four grant types defined in the OAuth 2.0 specification or using an extension grant type.  The authorization grant type depends on the method used by the client to request authorization and the types supported by the authorization server.
  3. The client requests an access token by authenticating with the authorization server and presenting the authorization grant.
  4. The authorization server authenticates the client and validates the authorization grant, and if valid issues an access token.
  5. The client requests the protected resource from the resource server and authenticates by presenting the access token.
  6. The resource server validates the access token, and if valid, serves the request.

Terminology

Before moving ahead, let’s define some terms.

  • Authorization Grant. An authorization grant is a credential representing the resource owner’s authorization to access its protected resources. A client uses the grant to obtain an access token. The OAuth 2.0 specification defines the following grant types:
    • Authorization code. The authorization code is obtained by using an authorization server as an intermediary between the client and the resource owner.
    • Implicit.The implicit grant is a simplified authorization code flow optimized for clients implemented in a browser using a scripting language such as JavaScript.
    • Resource owner password credentials. The resource owner password credentials (i.e. username and password) can be used directly as an authorization grant to obtain an access token.
    • Client credentials.The client credentials (or other forms of client authentication) can be used as an authorization grant when the authorization scope is limited to the protected resources under the control of the client, or to protected resources previously arranged with the authorization server.
  • Access Token. Access tokens are credentials used to access protected resources. An access token is a string representing an authorization issued to the client. The string is usually opaque to the client. Tokens represent specific scopes and durations of access, granted by the resource owner, and enforced by the resource server and authorization server.
  • Refresh Token. Refresh tokens are credentials used to obtain access tokens. Refresh tokens are issued to the client by the authorization server and are used to obtain a new access token when the current access token becomes invalid or expires, or to obtain additional access tokens with identical or narrower scope (access tokens may have a shorter lifetime and fewer permissions than authorized by the resource owner). Issuing a refresh token is optional at the discretion of the authorization server.

More About Refresh Token

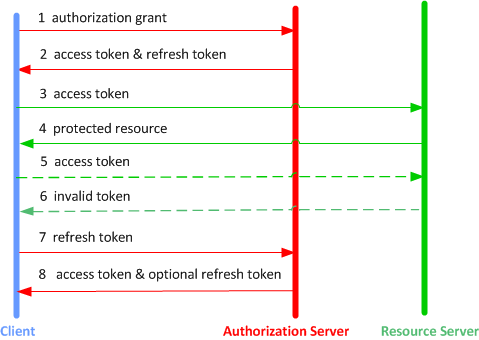
If the authorization server issues a refresh token, it is included when issuing an access token. A refresh token is a string representing the authorization granted to the client by the resource owner. The string is usually opaque to the client. The token denotes an identifier used to retrieve the authorization information. Unlike access tokens, refresh tokens are intended for use only with authorization servers and are never sent to resource servers.

OAuth Flow Refresh Token

Fig 2  OAuth 2.0 Protocol Flow with Refresh Token

  1. The client requests an access token by authenticating with the authorization server, and presenting an authorization grant.
  2. The authorization server authenticates the client and validates the authorization grant, and if valid issues an access token and a refresh token.
  3. The client makes a protected resource request to the resource server by presenting the access token.
  4. The resource server validates the access token, and if valid, serves the request.
  5. Steps 3 and 4 repeat until the access token expires. If the client knows the access token expired, it skips to step 7, otherwise it makes another protected resource request.
  6. Since the access token is invalid, the resource server returns an invalid token error.
  7. The client requests a new access token by authenticating with the authorization server and presenting the refresh token. The client authentication requirements are based on the client type and on the authorization server policies.
  8. The authorization server authenticates the client and validates the refresh token, and if valid issues a new access token (and optionally, a new refresh token).