The following are the preliminary steps to access Google Cloud Storage by using the JSON API client library in Python. Basically, you must do the following:
- Download and install the Python JSON API client library. In a terminal window execute the following command:
[sudo] pip install --upgrade google-api-python-client
- Enable the use of the JSON API for your Google Cloud Storage project.
- Set the client authorization information.
See the Quickstart steps described below.
Background
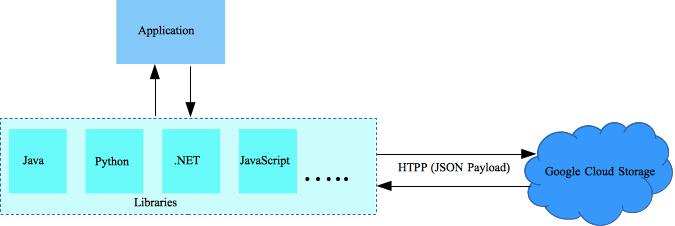
Before an application can use the JSON API, the user must allow access to her Google Cloud Storage private data. Therefore, the following steps must be performed:
- The application must be authenticated.
- The user must grant access to the application.
- The user must be authenticated in order to grant that access.
All of this is accomplished with OAuth 2.0 and libraries written for it.
Important Concepts
- Scope. JSON API defines one or more scopes that declare a set of operations permitted. When an application requests access to user data, the request must include one or more scopes. The user needs to approve the scope of access the application is requesting.
- Refresh and Access Tokens. When a user grants an application access, the OAuth 2.0 authorization server provides the application with refresh and access tokens. These tokens are only valid for the scope requested. The application uses access tokens to authorize API calls. Access tokens expire, but refresh tokens do not. Your application can use a refresh token to acquire a new access token.
Warning: Keep refresh and access tokens private. If someone obtains your tokens, they could use them to access private user data.
- Client ID and Client Secret. These strings uniquely identify an application and are used to acquire tokens. They are created for your Google APIs Console project on the API Access pane of the Google APIs Console. There are three types of client IDs, so be sure to get the correct type for your application:
- Web application client IDs
- Installed application client IDs
- Service Account client IDs
Keep your client secret private. If someone obtains your client secret, they could use it to consume your quota, incur charges against your Google APIs Console project, and request access to user data.
Building and Calling the Service
The following steps describe how to build an API-specific service object, make calls to the service, and process the response.
- Build the Service. You use the build() function to create a service object. It takes an API name and API version as arguments. You can see the list of all API versions on the Supported APIs page. The service object is constructed with methods specific to the given API. The following is an example:
from apiclient.discovery import build as discovery_build service = discovery_build('storage', 'v1beta2', ....) - Create the Request. Methods are defined by the API. After calling a method, it returns an HttpRequest object. The following is an example:
request = service.buckets().insert( project=project_id, body={'name': bucket_name}) - Get the Response. Creating a request does not actually call the API. To execute the request and get a response, call the execute() function as follows:
response = request.execute()
Quickstart
To best way to get started is to access the documentation Google Cloud Storage JSON API Client Library for Python. Follow the steps in the Quickstart section to create a starter application to get you up and running. In particular, perform these steps:
- Select the platform you want to use. For simplicity, select Command Line.
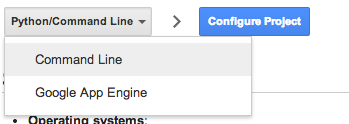
Command Line Application
- Click the Configure Project button. A dialog window is displayed.
- In the dropdown list select the name of the project for which you want to enable the JSON API.
- Click the Continue button. An instruction list is displayed. For convenience the instructions are repeated below.
- Install Python 2 (if not installed yet).
- Download the starter application and unzip it. Notice, you must download the application from the link shown in the instruction list.
- Download the client secrets file. Use it to replace the file included in the starter application. Notice, you must download the client secrets file from the link shown in the instruction list.
- In a terminal window, from within the application directory, run the application as follows:
python sample.py
The first time you run the application, a Web page is displayed asking you to allow access to your Google Cloud Storage. Click the Accept button,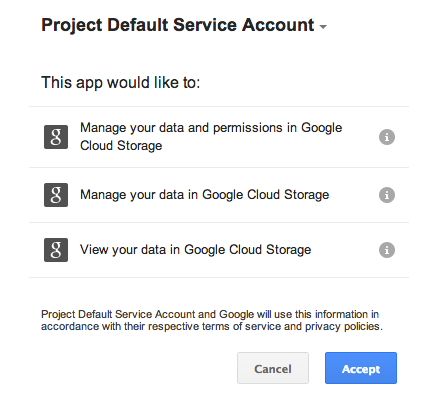
Allow Project Access
The first time you will get the following output:
Authentication successful.
Success! Now add code here.
You are up and running! At this point you will want to add Cloud Storage API calls to the sample.py file as shown below.
Analyzing Sample.py
In this section we analyze the sample.py code to highlight the key points. In essence sample.py shows how to set up the OAuth 2.0 credentials to access a project. Notice the code shown is slightly different from the downloaded one. This is to make it more readable.
The following line obtains the path to the client_secrets.json. This file contains the credentials (OAuth 2.0 information) the sample.py needs to access your project. You can download this file from the Cloud Console at this location: <https://cloud.google.com/console#/project/[your project ID]/apiui>
CLIENT_SECRETS = os.path.join(os.path.dirname(__file__), 'client_secrets.json')
Next you set the Flow object to be used for authentication. The example below add two scopes, but you should add only the scope you need. For more information on using scopes. see Google+ API Best Practices.
RW_SCOPE = 'https://www.googleapis.com/auth/devstorage.read_write'
RO_SCOPE = 'https://www.googleapis.com/auth/devstorage.read_only'
FC_SCOPE = 'https://www.googleapis.com/auth/devstorage.full_control'

FLOW = client.flow_from_clientsecrets(
  CLIENT_SECRETS,
  scope=[RW_SCOPE, RO_SCOPE],
  message=tools.message_if_missing(CLIENT_SECRETS))
The following lines are critical. If the credentials (storedcredentials.json) don’t exist or are invalid the native client flow runs. The Storage object will ensure that if successful the good credentials will get written back to the file.
storage = file.Storage('storedcredentials.json')
credentials = storage.get()
if credentials is None or credentials.invalid:
  credentials = tools.run_flow(FLOW, storage, flags)
Customization
Add the following function to list the objects contained in a bucket.
from json import dumps as json_dumps

def listObjects(bucketName, service):
    print 'List objects contained by the bucket "%s".' % bucketName
    fields_to_return =
      'nextPageToken,items(bucket,name,metadata(my-key))'
    request = service.objects().list(bucket=bucketName,
                fields=fields_to_return)
    response = request.execute()
    print json_dumps(response, indent=2)
Call the function from main as follows:
listObjects('myBucket', service)
RELATED ARTICLES
- Cloud Storage API Python library Cloud Storage API
- Python client library Getting Started
- Google Cloud Storage JSON API Getting Started.


 icon in the upper right corner of Eclipse. From the pop-up menu select PyDev and click OK.