Using Github in Eclipse Addendum

Create a Repository in the Project Directory

  1. In the Package Explorer right click on the project name.
  2. Select Team->Share Project. The Configure Git Repository dialog is displayed.
  3. Check the box by Use or create repository in parent folder of project.
  4. In the selection area, click on the project folder. The name is duplicated in the box below.
  5. Click the Create Repository button.
  6. Click Finish. The repository shows in the list of the local repositories view.
  7. In the repositories view, select the repository just created. The unstaged project files are displayed in the Unstaged Changes view.

Configure Push Operation

  1. In repository view, right-click on the Remotes node.
  2. In the pop-up dialog window, click Create Remote. The New Remote dialog window is displayed.
  3. Accept the origin default value. Click OK.
  4. In the next dialog window, click the Change button.
  5. Enter the URL of the remote github location. The other values should be filled automatically.
  6. Click Finish.
  7. Click Save.

Merge Local and Remote Repositories

  1. In the Remotes node under origin, look for the green arrow pointing down, this is the Fetch arrow. Right click on the Fetch entry and select Configure Fetch in the popup window. You should see the URI, assure that it points to the remote repository.
  2. Look in the Ref mappings section of the popup. It might be empty. You must indicate which remote references you want to fetch. Click Add.
  3. Type in the branch name you need to fetch from the remote repository, usually master.
  4. Continue through the wizard.  Ignore the warning Remote tracking branch ‘refs/remotes/origin/master’ not found in local repository.
  5. Click Finish.
  6. In the last popup window, click Save and Fetch.  This will fetch the remote reference
  7. Click OK.

Look in the Branches folder of your local repository. You should now see the remote branch in the Remote Tracking folder. You should see something similar to the following:

  1. You should have a list of un-staged files. Stage all the project files but one (we need a second staging later to push all the committed files).
  2. Enter a comment such as “first commit”.
  3. Click the Commit. This puts the project under configuration control.  in the Local folder, you should see something similar to the following:
  4. Expand the Local folder of Branches, right click on the node named master.
  5. Select Merge. The Merge wizard is displayed.
  6. In the Merge wizard, under Remote Tracking folder, select the remote branch named origin/master.
  7. Click Merge.
  8. Follow the merge wizard steps.
  9. Now stage the remaining file. Add comment “first commit”.
  10. Click the Commit and Push
  11. Go through the Wizard steps.
  12. Click the Finish.
  13. Wait for the push operation to be configured and then click the OK button.


Build GCP Drive Client

This post demonstrates how to build a Google Drive client application in Java. This command line client app shows the basic logic to interact with the Google Drive service and eliminates unnecessary clutter.

The application interacts with the Google Drive via its Drive REST API using the Google Drive Java client library. For more information, go to Google API Client Libraries then click on the Java link. In the menu bar click APIS, then enter Ctrl-F and search for drive, You will get this:

Click on the version link (v3, in the example). This will take you to the Drive API Client Library for Java. Note that at the bottom of the page in the section “Add Library to Your Project”, there are several tabs. If you click the Maven tab, you get the dependency in JSON format to add to the pom.xml file in your project. This is an example:

    <dependency>
      <groupId>com.google.apis</groupId>
      <artifactId>google-api-services-drive</artifactId>
      <version>v3-rev82-1.22.0</version>
    </dependency>

See also Putting to REST the Cloud Service APIs.

The app uses a simple UI which allows the user to perform tasks such as: list the files in a project, upload files, download files and so on.

You can download the code at this location: gcp-drive-client.  See also Import a Maven Project. Please, refer to README file for the latest example code information.

Application Architecture

This section describes the components of the application and delegates the details to the actual code implementation.


  1. Main.  Gets authorization to access Google Drive service. Reads the default settings. Instantiates the command classes. Delegates to the SimpleUI class the display of the selection menu and the processing of the user’s input.
  2. SimpleUI. Displays the menu of choices for the user can select from. It processes the
    user’s input and calls the proper method based on the user’s selection. Each method calls the related Drive REST API.
  3. FileOperations. Contains methods to perform Google Drive file operations.
    The following example code shows how to list the files contained in the user’s account:

     	 /***
    	  * Retrieve the list of user's files.
    	  * @throws IOException An I/O error has been detected.
    	  ***/
    	  public static void listFiles() throws IOException {
    		  
    		  // Define a list to contain file objects.
    		  List&amp;lt;File&amp;gt; fileList = new ArrayList&amp;lt;File&amp;gt;();
    		  
    		  Files.List request = authorizedDriveClient.files().list();
    		  
    		  
    		  do {
    		      try {
    		        FileList files = request.execute();
    	
    		        fileList.addAll(files.getItems());
    		        request.setPageToken(files.getNextPageToken());
    		      } catch (IOException e) {
    		        System.out.println("An error occurred: " + e);
    		        request.setPageToken(null);
    		      }
    		      
    		      // Display files information.
    		      Utilities.displayFilesInfo(fileList);
    		    
    		  } while (request.getPageToken() != null &amp;amp;&amp;amp;
    		             request.getPageToken().length() &amp;gt; 0);
    
    	  }
    
    
  4. Various utilities. Used to perform routine command tasks and housekeeping.


Application Workflow

The following figure shows the application time sequence (or workflow).

Drive Workflow

The first time you start the application, the Main class performs the following actions:

  • Initializes the default settings.
  • Creates authorized drive service.
  • Initializes the command classes
  • Initializes the SimpleUI class.
  • Starts the endless loop to process user inputs.

The SimpleUI class keeps processing user inputs, until the user enters the command to exit the loop. At that point, the application terminates.

Application Implementation

Enable Google Drive API

To build the application, you will use Eclipse. Before you can do that, assure that you have enabled the service API as described next.

  1. Follow the steps described in Enable Google Service API.
  2. Download the client credentials information in a file (for example, client_secrets.json). Follow the steps described in Create OAuth Client Credentials.

Create the Application Project

  1. In Eclipse, create a Maven project.  For more information, see Create a Maven Project.
  2. Add reference to the authentication app JAR file created in  Build GCP Service Client Authentication. Alternatively, and a for quickest results, import the downloaded project. For more information, see Import a Maven Project 

Modify the pom.xml File

A key step in creating the application project is to configure the pom.xml file correctly to define the dependencies required to implement the client application. For more information see Define Dependencies in pom.xml.
That’s it. Happy googling with Google Drive.

Build GCP Cloud Storage Client

The post demonstrates how to build a Google Cloud Storage client application in Java. This command line client app shows the basic logic to interact with Google Cloud Storage service and eliminates unnecessary clutter.

The application interacts with Google Cloud Storage via its JSON API using the related Google Java client library.

For more information, go to Google API Client Libraries then click on the Java link. In the menu bar click APIS, then enter Ctrl-F and search for storage, You will get this:

Click on the version link (v1, in the example). This will take you to the Cloud Storage JSON API Client Library for Java. Note that at the bottom of the page in the section “Add Library to Your Project”, there are several tabs. If you click the Maven tab, you get the dependency in JSON format to add to the pom.xml file in your project. This is an example:

  <dependency>
      <groupId>com.google.apis</groupId>
      <artifactId>google-api-services-storage</artifactId>
      <version>v1-rev111-1.22.0</version>
  </dependency>

See also Putting to REST the Cloud Service APIs.

The app uses a simple UI which allows the user to perform tasks such as: list the buckets in a project, list objects in a bucket, create a bucket, create an object and so on.

You can download the code at: gcp-storage-client.  See also Import a Maven Project. Please, refer to README file for the latest example code information.

For background information, see GCP Cloud Storage Background.

Application Architecture

This section describes the  application components and delegates the details to the actual code implementation. The following is the app architecture:

  1. Main.  This class is the application entry point. It performs the following tasks:
    • Gets the authenticated client object authorized to access the Google Cloud Storage service.
    • Reads the default settings.
    • Instantiates the operations classes.
    • Delegates to the SimpleUI class the display of the selection menu and the processing of the user’s input.
  2. User Interface
    • UserInterface. Abstract class that defines the variables and methods required to implement the SimpleUI class.
    • SimpleUI. It extends the UserInterface class and performs the following tasks:
    • Displays a selection menu for the user.
    • Processes the user’s input and calls the proper method based on the user’s selection.
    • Each method calls the related Google Cloud Storage JSON API.
  3. Core Classes
    • ProjectOperations. Contains methods to perform Google Cloud Storage project operations.
    • BucketOperations.  Contains methods to perform Google Cloud Storage bucket operations.
    • ObjectsOperations. Contains methods to perform Google Cloud Storage object operations.
      • ObjectLoaderUtility. Performs object upload. This class is just a container. The actual work is done by the contained classes:
        • RandomDataBlockinputStream. Generates a random data block and repeats it to provide the stream for resumable object upload
        • CustomUploadProgressListener. Implements a progress listener to be invoked during object upload.
  4. Authentication.
    • GoogleServiceClientAuthentication. This is an abstract class which obtains the credentials for the client application to allow the use of the requested Google service REST API.
    • IGoogleServiceClientAuthentication.  Defines variables and methods to authenticate clients so they can use the selected Google service REST APIs.
    • AuthenticateServiceClient. Creates an authenticated client object that is authorized to access the selected Google service API.

For more information, see Create Google Service Authentication App.

  1. Utilities.
    • IUtility.  Defines fields and methods to implement the Utility class.
    • Utility.  Defines utility methods and variables to support the application operations such as menu creation, regions list initialization and so on.
    • ServiceDefaultSettings.  Reads the service client default settings from the related JSON file. The file contains information such as project ID, default e-mail and so on.

Application Workflow

The following figure shows the application time sequence (or workflow):


The first time the user starts the application, the Main class performs the following tasks:

  • Reads the default settings.
  • Creates authenticated storage service client.
  • Initializes the operation classes.
  • Initializes the SimpleUI class.
  • Starts the loop to process user inputs.

The SimpleUI class loops to process the user’s commands until she terminates the loop. At that point, the application terminates.

Application Implementation

Enable Google Cloud Storage API

To build the application, you will use Eclipse. Before you can do that, assure that you have enabled the service API as described next.

  1. Follow the steps described in Enable Google Service API.
  2. Download the client credentials information in a file (for example, client_secrets.json). Follow the steps described in Create OAuth Client Credentials.

Create the Application Project

  1. In Eclipse, create a Maven project.  For more information, see Create a Maven Project.
  2. Add reference to the authentication app JAR file created in  Build GCP Service Client Authentication. Alternatively, and a for quickest results, import the downloaded project. For more information, see Import a Maven Project 

Modify the pom.xml File

A key step in creating the application project is to configure the pom.xml file correctly to define the dependencies required to implement the client application. For more information see Define Dependencies in pom.xml.
That’s it. Happy googling with Google Cloud Storage.

Build GCP Service Client Authentication

A client application must be authenticated to use any Google Cloud platform service through its REST API; a common and important first step for all the services. This post shows how to create a Java application which encapsulates the necessary authentication logic  so you do not have to recreate it time and time again with the possibility of making mistakes.   For simplicity, the example shows how to authenticate command line (aka, native) client applications and authorize their access to Google Cloud Platform services. At this time the app creates authenticated clients for the following services: Google Storage, Google Drive, YouTube, and BigQuery.

This post also contains important background information that you need to know to use Google Cloud service APIs. We suggest you take look before you proceed at Background Information.

Authentication App Architecture

The Authentication app is a Java application built as a Maven project. With Maven you can define all the up-to-date dependencies by linking to the necessary Google libraries on-line.  For more information see GCP Cloud Service Client Apps – Common Tasks.

Find reference information for the Google APIs libraries at Supported Google APIs (Java) . Find latest info at the Maven Repository and search for the specific Google library

The authentication application described in this post has the following architecture:


  1. IGoogleClientAuthentication. Defines variables and methods to authenticate clients so they can use Google service REST APIs.
  2. GoogleServiceClientAuthentication. This is an abstract class which contains the actual logic to obtain the credentials for the client application so it can use the requested Google service REST API. The class uses Google OAuth 2.0 authorization code flow that manages and persists end-user credentials.
  3. AuthenticateGoogleServiceClient. This class  extends GoogleServiceClientAuthentication and implements IGoogleClientAuthentication. It creates an authenticated client object that is authorized to access the selected Google service API.
    Based on the caller’ selection, it allows the creation of an authorized service to access  Google service APIs such as Google Cloud Storage API or Google Drive API.

The class assumes that you already have created a directory to store the file with the client secrets. For example .googleservices/storage. The file containing the secrets is client_secrets.json.

Authentication App Workflow

The following figure shows the example application workflow:

The client application calls the authentication method for the service selected by the user passing the scope information.  The AuthenticateGoogleServiceClient  class performs all the steps to create an authenticated client that is authorized to use the Google service REST API, in particular it performs the following:

  • Reads the client secrets. You must store these secrets in a local file, before using the application  You obtain the secretes through the Google developers console and downloading the related JSON information (for native applications) from your service project.  The file name used in the example is client_secrets.json, you can use any other name as long as you use the json suffix. For details about the file name, directory names, see the code comments.
  • Uses Google OAuth2 to obtain the authorized service object. The first time you run the application, a browser instance is created to ask you as the project owner to grant access permission to the client. From then on, the credentials are stored in a file named StoredCredential.  The name of this file is predefined in the StoredCredential class. This file is stored in the same directory where the client_secrets.json is stored. See the code comments for details. If you delete the StoredCredential file, the resource owner is asked to grant access again.
  • Google OAuth2 returns the authenticated service object to the AuthenticateGoogleServiceClient which, in turn, returns it to the client application. The client can then use the authenticated object to use the Google service REST API. For example, in case of the Google Storage service, it can  list buckets in the project, create buckets, create objects in a bucket, list objects in a bucket and so on.

Background Information

Enable a Google Service API

In order to use a service API in your application, you must enable it as shown next.

Continue reading

GCP Cloud Service Client Apps – Common Tasks

The following are some common tasks that you must perform when using Google Cloud Service APIs such as enabling a service API, installing an API client library, performing client authentication, and so on.

Prerequisites

  1. Eclipse Version 4.xx. Before installing Eclipse assure that you Java installed (at the least the JRE). To download Java development environment go to Java SE at a Glance.
  2. Maven plugin installed. Make sure to set your Eclipse preferences as follows:
    • Within Eclipse, select Window > Preferences (or on Mac, Eclipse > Preferences).
    • Select Maven and select the following options:
      • “Download Artifact Sources”
      • “Download Artifact JavaDoc”

Create a Maven Project

  1. In Eclipse, select File->New->Project. The Select a wizard dialog window is displayed
  2. Expand the Maven folder and select Maven ProjectClient Auth Maven Project
  3. Click Next.
  4. In the next dialog window, check Create a simple project (skip archetype selection).
  5. Click Next. The New Maven project dialog is displayed.
  6. Enter the Group Id information, for instance com.clientauth.
  7. Enter the Artifact Id (use the name of the project) for instance ClientAuth.
  8. Accept the Version default 0.0.1-SNAPSHOT. Or assign a new version such as 1.0.
  9. Assure that the Packaging is jar.
  10. Enter the project name, for example ClientAuthentication.
  11. Click Finish.
    This creates a default pom.xml file that you will use to define your application dependencies as shown next.

Define Dependencies in pom.xml

To the default pom.xml, you must add the dependencies specific to your application. The example shown next refers to a console application which uses Google Storage service. To obtain the latest dependencies (aka artifacts) information, perform the following steps:

OAuth2 API Dependency

  1. In your browser, navigate to https://developers.google.com/api-client-library/java/apis/.
  2. In the page, click Ctrl-F and in the box enter oauth2. This will take you to the row containing the OAuth2 library info.
  3. Click on the version link, let’s say v2. This displays the  Google OAuth2 API Client Library for Java page.
  4. At the bottom, in the Add Library to Your Project section, click on the Maven tab. This displays the dependencies information similar to the following:
    <project>
      <dependencies>
        <dependency>
          <groupId>com.google.apis</groupId>
          <artifactId>google-api-services-oauth2</artifactId>
          <version>v2-rev126-1.22.0</version>
        </dependency>
      </dependencies>
    </project>
  5. Copy and paste the <dependency> section in the pom.xml file.
  6. If you want to refer to other versions of the API library click on the link at the bottom of the page. See all versions available on the Maven Central Repository.
  7. You can define the version in a parametric way as follows:
    <version>${project.oauth.version}</version>
    

    Where the

    ${project.oauth.version}

    is defined in the properties section as follows:

    <properties>
     <project.http.version>1.22.0</project.http.version>
     <project.oauth.version>v2-rev126-1.22.0</project.oauth.version>
     <project.storage.version>v1-rev105-1.22.0</project.storage.version>
     <project.guava.version>21.0</project.guava.version>
     <project.build.sourceEncoding>UTF-8</project.build.sourceEncoding>
    </properties>

    So the new format is as follows:

    <dependency>
      <groupId>com.google.apis</groupId>
      <artifactId>google-api-services-oauth2</artifactId>
      <version>${project.oauth.version}</version>
    </dependency>

Guava Dependency

Guava is a suite of core and expanded libraries that include utility classes, google’s collections, io classes, and much much more.

  1. In your browser, navigate to https://mvnrepository.com/.
  2. In the search box, enter the name of the API library  google guava. 
  3. Click on the tile of the library Guava: Google Core Libraries For Java.
  4. In the displayed page click on the required version.
  5. Click on the Maven tab.
  6. Check the Include comment …. box
  7. Click on the box. This will copy the content to the clipboard.
  8. Paste the content in the pom file

Managing Dependencies

The Guava library version might conflict with the OAuth2 library version.  In order to avoid the conflict we need to add a dependencyManagement section to the pom.xml file. Follow these steps:

  1. In Eclipse, in the pom.xml editor, click on the Dependencies tag.
  2. Click on the Manage button.
  3. In the left pane, select the Guava and OAuth libraries.
  4. Click the Add button. This create the dependencyManagement section. The following shows an example:
    <dependencyManagement>
      <dependencies>
        <dependency>
          <groupId>com.google.apis</groupId>
          <artifactId>google-api-services-oauth2</artifactId>
          <version>${project.oauth.version}</version>
       </dependency>
       <dependency>
         <groupId>com.google.guava</groupId>
         <artifactId>guava</artifactId>
         <version>${project.guava.version}</version>
       </dependency>
     </dependencies>
    </dependencyManagement>

HTTP Dependency

This library is needed to allow a Java application to make HTTP asynchronous requests over the network through the REST API of the cloud service it uses for example Google Storage.

  1. In your browser, navigate to https://mvnrepository.com/.
  2. In the search box, enter the name of the library google http client. 
  3. Click on the tile of the library Google HTTP Client Library For Java.
  4. In the displayed page click on the required version.
  5. Click on the Maven tab.
  6. Check the Include comment …. box
  7. Click on the box. This will copy the content to the clipboard.
  8. Paste the content in the pom file

Jackson Extensions to HTTP Library Dependency

This library is needed to allow a Java application to perform XML and JSON parsing.

  1. In your browser, navigate to https://mvnrepository.com/.
  2. In the search box, enter the name of the library google http client. 
  3. Click on the tile of the library  Jackson 2 Extensions To The Google HTTP Client Library For Java.
  4. In the displayed page click on the required version (the same you used for the HTTP library).
  5. Click on the Maven tab.
  6. Check the Include comment …. box
  7. Click on the box. This will copy the content to the clipboard.
  8. Paste the content in the pom file

Google Storage API Dependency

  1. In your browser, navigate to https://developers.google.com/api-client-library/java/apis/.
  2. In the page, click Ctrl-F and in the box enter cloud storage. This will take you to the row containing the Cloud Storage library info.
  3. Click on the version link, let’s say v1. This displays the Cloud Storage JSON API Client Library for Java  page.
  4. At the bottom, in the Add Library to Your Project section, click on the Maven tab.
  5. Copy and paste the dependency section in the pom.xml file.
Once you have updated the pom, make sure to update the project by right-clicking on the project name then selecting
Maven->Update Project…

Import a Maven Project

  1. Download the archived project from the specified location.
  2. Unzip the downloaded archive.
  3. In Eclipse, create a work space or use an existing one.
  4. Click OK.
  5. Click File->Import.
  6. In the wizard window, select Maven->Existing Maven Projects.
    SelectMavenProjects
  7. Click Next.
  8. Navigate (click the Browse… button), to the location containing the unzipped code archive. The following is an example of a project to import:
    Import Maven Projects
  9. Click OK. You get a window similar to this:
    Imported Maven Projects
  10. Click Finish.

What Can Go Wrong?

Local JARs

You may have local JARs that must be added to the project path. If they are not included you can have errors similar to this: JAR_Error.

To solve this kind of problems perform the following steps:

  1. In Eclipse, in the Package Explorer, right click on the project name.
  2. Navigate to Properties->Java Build Path.
  3. Click on the Libraries tag.
  4. Click the Add JARs… button
  5.  Select your local JAR, from the lib folder for example, and click OK.
    You will get a window similar to the following:
    Local Jar
  6. Click OK.
    The error should disappear from the list in the Problems window.

Execution Environment

You could get a warning about the execution environment similar to the following:

Execution Warning

To solve this kind of problems perform the following steps:

  1. In Eclipse, in the Package Explorer, right click on the project name.
  2. Navigate to Properties->Java Build Path.
  3. Click on the Libraries tag.
  4. Select the current JRE System Library.
  5. Click the Remove button.
  6. Click the Add Library… button.
  7. Select the JRE System Library.
  8. Click Next.
  9. Click Finish. The new JRE System Library version should be listed.
  10. Click OK.
    The warning should disappear from the list in the Problems window.

Compiler Version

You could get an error about the compiler version similar to the following:

Compiler Error

To solve this kind of problems perform the following steps:

  1. In Eclipse, in the Package Explorer, right click on the project name.
  2. Navigate to Properties->Java Compiler.
  3. In the right pane, uncheck Enable project specific settings.
  4. Click the link Configure Workspace Settings….
  5. In the next window, select version 1.8 or higher.
  6. Check Use default compliance settings.
  7. Click OK.
  8. Click OK.
  9. Click Yes, in the popup asking to recompile the project.
    The error should disappear from the list in the Problems window.

Create Runnable JAR

  1. In Eclipse, in the Package Explorer, right click on the project name.
  2. Click Export.
  3. Expand the Java folder.
  4. Click Runnable JAR file.
  5. Click Next.
  6. In the Launch configuration, select the one applicable to the project.
    This is the configuration you define to run the application in Eclipse.
  7. In the Export destination enter or browse to the location where to store the JAR and enter the name for the JAR file.
    JAR Runnable
  8. Click Finish.
  9. To execute the application, open a terminal window.
  10. Change the directory where the JAR is located.
  11. Enter a command similar to the following:
      java -jar google-drive-client.jar
    

See Also


AWS Elastic Map Reduce Quick Start – Dashboard

This post provides essential instructions on how to get started with  Amazon Elastic MapReduce  (Amazon EMR). You will learn how to create a sample Amazon EMR cluster by using the AWS Management Console. You then run a Hive script to process data stored in Amazon S3.

The instructions in this example do not apply to production environments and they do not cover in depth configuration options. The example shows how to quickly set up a cluster for evaluation purposes. For questions or issues you can reach out to the Amazon EMR team by posting on the Discussion Forum.

Cost

The sample cluster that you create runs in a live environment and you are charged for the resources used. This example should take an hour or less, so the charges should be minimal. After you complete this example, you should reset your environment to avoid incurring further charges.For more information, see  Reset EMR Environment.

Pricing for Amazon EMR varies by region and service. For this example, charges accrue for the Amazon EMR cluster and Amazon Simple Storage Service (Amazon S3) storage of the log data and output from the Hive job. If you are within your first year of using AWS, some or all of your charges for Amazon S3 might be waived if you are within your usage limits of the AWS Free Tier.
For more information about Amazon EMR pricing and the AWS Free Tier, go to Amazon EMR Pricing   and  AWS Free Tier.

You can use the Amazon Web Services Simple Monthly Calculator to estimate your bill.

Sample EMR Cluster Prerequisites

The following are the preliminary steps you must perform to complete the example.

  1. Create an AWS account.
  2. Create an S3 bucket.
    The example in this topic uses an S3 bucket to store log files and output data.
    Due to Hadoop constraints, the bucket name should conform to these requirements:

    • It must contain lower case letter, numbers, periods and hyphens.
    • It cannot end with a number.
      Example: mycompany.username.vernumber-emr-quickstart.
  3. Click on the S3 bucket name. The bucket page is displayed.
  4. Create 2 folders named: logs and output respectively.
    Make sure that the output folder is empty. For more information, see Creating a Folder.
  5. Create an Amazon EC2 Key Pair.
    You need the key pair to connect to the nodes in the cluster.

Launch the Sample Amazon EMR Cluster

  1. In your browser, navigate to the Amazon management console.
  2. In the Analytics section click on EMR. The console dashboard is displayed.
    EMR Console
  3. Click the Create cluster button.
    The Create Cluster – Quick Options page is displayed.
    For more information, see Using Quick Cluster Configuration Overview
  4. Accept the default values except for the following fields:
    • In the Cluster name box, enter any name that has meaning to you
    • For the S3 folder box, click on the folder icon to select the path to the logs folder that you created.
    • For the EC2 key pair box, from the drop-down list, choose the key pair that you created.
  5. Click the Create cluster button.

AWS Elastic Map Reduce (EMR)

Amazon Elastic MapReduce (Amazon EMR) is a web service that makes it easy to quickly and cost-effectively process vast amounts of data. Amazon EMR simplifies big data processing, providing a managed Hadoop framework that makes it easy, fast, and cost-effective for you to distribute and process vast amounts of data across dynamically scalable Amazon EC2 instances.You can also run other popular distributed frameworks such as Apache Spark and Presto (SQL Query Engine) in Amazon EMR, and interact with data in other AWS data stores such as Amazon S3 and Amazon DynamoDB. For a quick overview, see Introduction to Amazon Elastic MapReduce.

Background

Amazon EMR enables you to quickly and easily provision as much computing capability as you need and add or reduce or remove it at any time. This is very important when dealing with variable or unpredictable processing requirements as it is often the case with big data processing.
For example, if the bulk of your processing occurs at night, you might need 100 virtual machine instances during the day and 500 instances at night. Or you might need a significant computing peak for a short period of time. With Amazon EMR you can quickly provision hundreds or thousands of instances, and release them when the work is completed. saving on the overall cost.

Computing Capacity

The following are some possible way to control computing capacity:

Build AWS EC2 Client

This topic shows how to create a Java console application to interact with Amazon EC2 by using AWS Java SDK. For more information, see Using the AWS SDK for Java. This is a command line client that eliminates unnecessary clutter and shows the basic logic to interact with Amazon EC2 . Hopefully this will help you to understand the syntax (and semantic ) of the API.

A separate project handles the creation of an EC2 authenticated client which is allowed to access the EC2 service REST API.

You can download the code at: aws-ec2-client and the related documentation at: aws-ec2-client-docs. Please, refer to the README file for the latest example code information. See also Import a Maven Project. You must also download the companion project at aws-auth-client and include it in the client app project. You can download the related documentation at: aws-auth-client-docs.

Application Internals

The following figure shows the application event trace:
aws ec2 client
A simple UI allows the user to perform tasks such as: create EC2 instances, list instances, assign instance attributes and so on.
The first time the user starts the application, the Main class performs the following tasks:

  • Creates an authorized EC2 client
  • Initializes the EC2 operations class
  • Initializes the SimpleUI class
  • Starts the loop to process the user’s input

The SimpleUI class loops to process the user’s input until the loop is exited. At that point, the application terminates.

Modify the pom.xml File

A key step in creating the application project is to configure the pom.xml file correctly to define the dependencies required to implement the client application. You can find the file at: pom.xml.

Application Components

This section describes the components of the application and delegates the details to the actual code implementation.

  1. Main. Instantiates the authenticated EC2 service client, initializes the operations and the UI classes.
  2. SimpleUI. Displays the menu of choices for the user. It processes the user’s input and calls the proper function based on the user’s selection.  Each function calls the related AWS EC2 Java library method (which in turn calls the related REST API).
  3. UserInterface.  Defines the attributes and methods required to implement the SimpleUI} class.
  4. AwsClientAuthentication. Creates an authenticated client which is allowed to use the EC2 API.
  5. IEC2Client. Defines fields and methods to implement the Ec2ClientAuthentication class.
  6. IUtility. Defines fields and methods to implement the Utility class.
  7. Utility. Defines utility methods and variables to support the application operations such as menu creation, regions list initialization and so on.
  8. EC2Operations. Performs EC2 operations selected by the user. The various methods call the related EC2 library functions that in turn call the REST APIs which interact with the EC2 service. The following example code shows how to get available instances associated with a specific key pair.
    public static void getInstancesInformation(String keyName) {
            List&lt;Instance&gt; resultList = new ArrayList&lt;Instance&gt;();
            DescribeInstancesResult describeInstancesResult = ec2Client.describeInstances();
            List&lt;Reservation&gt; reservations = describeInstancesResult.getReservations();
            for (Iterator&lt;Reservation&gt; iterator = reservations.iterator(); iterator.hasNext();) {
                Reservation reservation = iterator.next();
                for (Instance instance : reservation.getInstances()) {
                    if (instance.getKeyName().equals(keyName))
                        resultList.add(instance);
                }
            }
            displayInstancesInformation(resultList);
        }  
    

Security Access Credentials

You need to set up your AWS security credentials before the sample code is able to connect to AWS. You can do this by creating a file named “credentials” at ~/.aws/ (C:\Users\USER_NAME.aws\ for Windows users) and saving the following lines in the file

[default]
    aws_access_key_id = <your access key id>
    aws_secret_access_key = <your secret key>

For more information, see Providing AWS Credentials in the AWS SDK for Java.

References

Build AWS S3 Client

This post shows how to create a Java console application to interact with Amazon S3 by using AWS Java SDK. For more information, see Using the AWS SDK for Java. A simple UI allows the user to perform tasks such as list the buckets in the account, list objects in a bucket, create a bucket, create an object and so on.

This is a command line client that eliminates unnecessary clutter and shows the basic logic to interact with Amazon S3. Hopefully, this will help you to understand the syntax (and semantic ) of the API.

A separate project handles the creation of an S3 authenticated client which is allowed to access the EC2 service REST API.

You can download the code here: aws-s3-client. Please, refer to the README file for the latest example code information. You must also download the companion project at aws-auth-client and include it in the client app project.

Prerequisites

📝 You must have Maven installed. The dependencies are satisfied by building the Maven package.
– 🚨 Also, assure to download the [aws-client-auth](https://github.com/milexm/aws-client-auth) project and include it in this client app project.
– 📝 If you use Eclipse to build the application (why not?) follow the steps describe at: GCP Cloud Service Client Apps – Common Tasks.

Application Internals

Application Class Diagram

The following is the application class diagram.

Application Workflow

The following figure shows the application event trace.

aws s3 client event trace

The first time the user starts the application, the Main class performs the following actions:

  • Creates an authorized S3 client
  • Initializes the operations classes
  • Initializes the SimpleUI class
  • Starts the loop to process user inputs

The SimpleUI class loops to process the user’s commands until the loop is exited. At that point, the application terminates.

Modify the pom.xml File

A key step in creating the application project is to configure the pom.xml file correctly to define the dependencies required to implement the client application. You can find the file at: pom.xml.

Application Components

This section describes the components of the application and delegates the details to the actual code implementation.

  1. Main.  Gets authorization to access the S3 service, initializes the command classes. Delegates to the SimpleUI class the display of the selection menu and the processing of the user’s input.
  2. SimpleUI. Displays the menu of choices for the user. It processes the user’s input and calls the proper function based on the user’s selection. Each function calls the related AWS S3 Java library method (which in turn calls the related REST API).
  3. AwsClientAuthentication. Creates Amazon S3 authenticated client.
  4. BucketOperations. Contains methods to perform S3 Bucket operations. The following code shows how to create a bucket, for example.
    public static void CreateBucket(String bucketName) throws IOException {        
    
      try {
            System.out.println("Creating bucket " + bucketName + "\n");
            // Create the bucket.
              s3Client.createBucket(bucketName);
          }
          catch (AmazonServiceException ase) {
            StringBuffer err = new StringBuffer();
            err.append(("Caught an AmazonServiceException, which means your request made it "
                         + "to Amazon S3, but was rejected with an error response for some reason."));
            err.append(String.format("%n Error Message:  %s %n", ase.getMessage()));
            err.append(String.format(" HTTP Status Code: %s %n", ase.getStatusCode()));
            err.append(String.format(" AWS Error Code: %s %n", ase.getErrorCode()));
            err.append(String.format(" Error Type: %s %n", ase.getErrorType()));
            err.append(String.format(" Request ID: %s %n", ase.getRequestId()));
         }
         catch (AmazonClientException ace) {
                System.out.println("Caught an AmazonClientException, which means the client encountered "
                  + "a serious internal problem while trying to communicate with S3, "
                  + "such as not being able to access the network.");
                System.out.println("Error Message: " + ace.getMessage());
         }
    }
    
  5. ObjectOperations . Contains methods to perform S3 Object operations. The following code shows how to list objects in a bucket, for example.
       public static void listObject(String bucketName) throws IOException {          
    
            try {
                    System.out.println("Listing objects");
    
                    ListObjectsRequest listObjectsRequest = new ListObjectsRequest()
                        .withBucketName(bucketName)
                        .withPrefix("m");
                    ObjectListing objectListing;
                    do {
                        objectListing = s3Client.listObjects(listObjectsRequest);
                        for (S3ObjectSummary objectSummary :
                            objectListing.getObjectSummaries()) {
                            System.out.println(" - " + objectSummary.getKey() + "  " +
                                    "(size = " + objectSummary.getSize() +
                                    ")");
                        }
                        listObjectsRequest.setMarker(objectListing.getNextMarker());
                    } while (objectListing.isTruncated());
            }
            catch (AmazonServiceException ase) {
                StringBuffer err = new StringBuffer();
    
                err.append(("Caught an AmazonServiceException, which means your request made it "
                      + "to Amazon S3, but was rejected with an error response for some reason."));
                err.append(String.format("%n Error Message:  %s %n", ase.getMessage()));
                err.append(String.format(" HTTP Status Code: %s %n", ase.getStatusCode()));
                err.append(String.format(" AWS Error Code: %s %n", ase.getErrorCode()));
                err.append(String.format(" Error Type: %s %n", ase.getErrorType()));
                err.append(String.format(" Request ID: %s %n", ase.getRequestId()));
    
            }
            catch (AmazonClientException ace) {
                System.out.println("Caught an AmazonClientException, which means the client encountered "
                    + "a serious internal problem while trying to communicate with S3, "
                    + "such as not being able to access the network.");
                System.out.println("Error Message: " + ace.getMessage());
            }
        }
       

Security Access Credentials

🚨 You need to set up your AWS security credentials before the sample code is able to connect to AWS. You can do this by creating a file named “credentials” in the  ~/.aws/ directory on Mac (C:\Users\USER_NAME.aws\ on Windows) and saving the following lines in the file:

[default]
    aws_access_key_id = &amp;amp;amp;amp;amp;amp;amp;amp;amp;amp;amp;amp;amp;amp;amp;amp;amp;amp;amp;amp;amp;amp;amp;amp;amp;amp;amp;amp;amp;amp;amp;amp;amp;amp;amp;amp;amp;amp;amp;amp;amp;amp;amp;amp;amp;amp;amp;amp;amp;amp;amp;lt;your access key id&amp;amp;amp;amp;amp;amp;amp;amp;amp;amp;amp;amp;amp;amp;amp;amp;amp;amp;amp;amp;amp;amp;amp;amp;amp;amp;amp;amp;amp;amp;amp;amp;amp;amp;amp;amp;amp;amp;amp;amp;amp;amp;amp;amp;amp;amp;amp;amp;amp;amp;amp;gt;;
    aws_secret_access_key = &amp;amp;amp;amp;amp;amp;amp;amp;amp;amp;amp;amp;amp;amp;amp;amp;amp;amp;amp;amp;amp;amp;amp;amp;amp;amp;amp;amp;amp;amp;amp;amp;amp;amp;amp;amp;amp;amp;amp;amp;amp;amp;amp;amp;amp;amp;amp;amp;amp;amp;amp;lt;your secret key&amp;amp;amp;amp;amp;amp;amp;amp;amp;amp;amp;amp;amp;amp;amp;amp;amp;amp;amp;amp;amp;amp;amp;amp;amp;amp;amp;amp;amp;amp;amp;amp;amp;amp;amp;amp;amp;amp;amp;amp;amp;amp;amp;amp;amp;amp;amp;amp;amp;amp;amp;gt;;

For information on how to create security credentials, see Create Access Credentials. See also Providing AWS Credentials in the AWS SDK for Java.

References

Getting Started with the AWS SDK for Java

Providing AWS Credentials in the AWS SDK for Java

Amazon S3 Documentation

Working with Amazon S3 Buckets

Working with Amazon S3 Objects

AWS Toolkit for Eclipse

Java Development Blog

GCP Cloud Storage Background

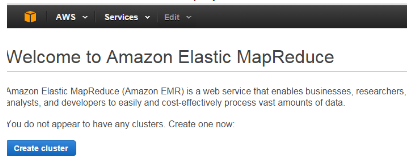
Google Cloud Storage (GCS) is an Infrastructure As Service (IasS) for storing and accessing
customers data. The service combines the performance and scalability of Google’s cloud
with advanced security and sharing capabilities.
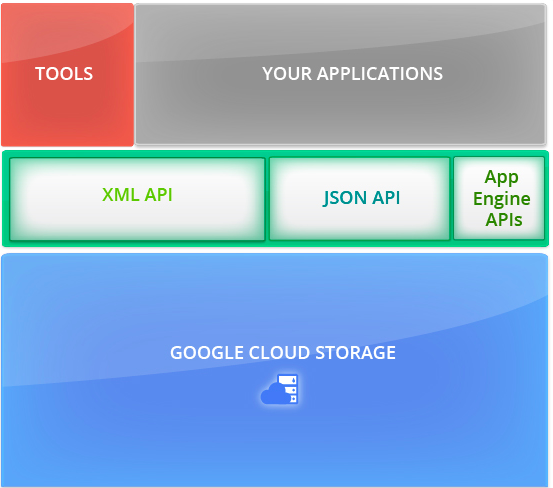
GCS provides a simple programming interface through standard HTTP methods PUT, GET,
POST, HEAD, and DELETE to store, share and manage data in the cloud. In this way, you
don’t have to rely on complicated SOAP toolkits or RPC programming.

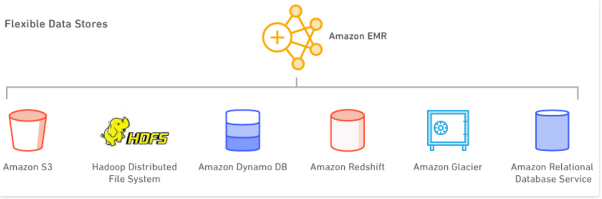
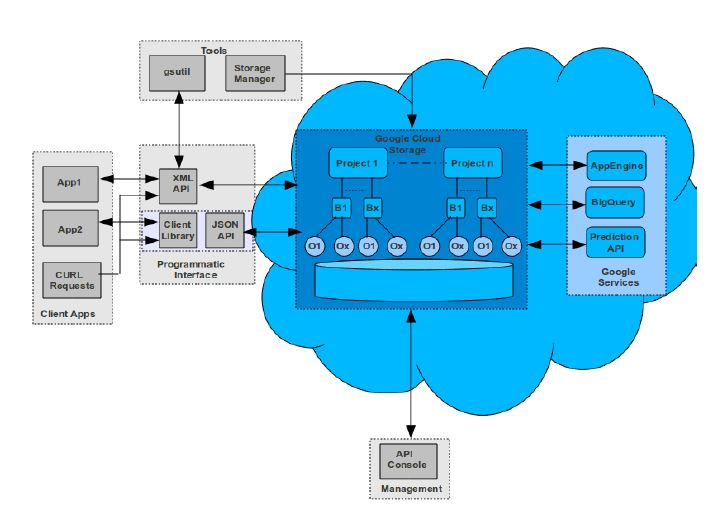
Google Cloud Storage Architecture

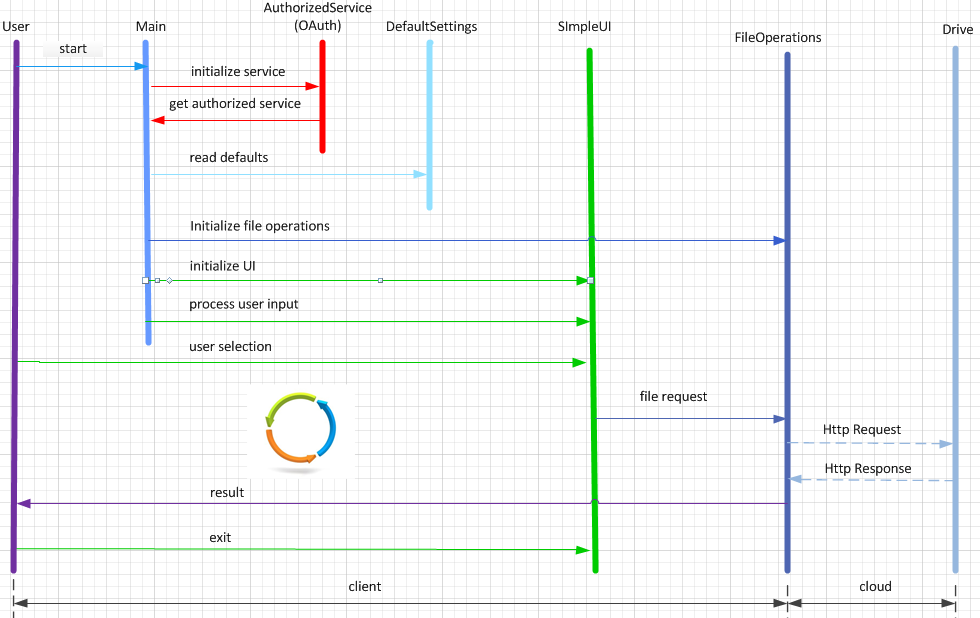
Let’s analyze the GCS main architectural components, as shown in the next figure, to gain
an understanding of GCS inner working and capabilities.

To use Google Cloud Storage effectively you need to understand some of the concepts on
which it is built. These concepts define how your data is stored in Google Cloud Storage.

Projects

All data in Google Cloud Storage belongs inside a project. A project consists of a set
of users, a set of APIs, and billing, authentication, and monitoring settings for those
APIs. You can have one project or multiple projects.

Buckets

Buckets are the basic containers that hold your data. Everything that you store in
Google Cloud Storage must be contained in a bucket. You can use buckets to
organize your data and control access to your data, but unlike directories and
folders, you cannot nest buckets.

  • Bucket names. Bucket names must across the entire Google Cloud Storage and have more restrictions than object names because every bucket resides in a single Google Cloud Storage namespace. Also, bucket names can be used with a CNAME redirect, which means they need to conform to DNS naming conventions. For more information, see Bucket and Object Naming Guidelines .

Objects

Objects are the individual pieces of data that you store in Google Cloud Storage. Objects have two components: object data and object metadata . The object data component is usually a file that you want to store in Google Cloud Storage. The object metadata component is a collection of name-value pairs that describe various object qualities.

  • Object names. An object name is just metadata to Google Cloud Storage. The following are the main properties:
    • An object name can contain any combination of Unicode characters (UTF-8 encoded) less than 1024 bytes in length.
    • An object name must be unique within a given bucket.
    • A common character to include in file names is a slash (/). By using slashes in an object name, you can make objects appear as though they’re stored in a hierarchical structure. For example, you could name an object /europe/france/paris.jpg and another object /europe/france/cannes.jpg. When you list these objects they appear to be in a hierarchical directory structure based on location; however, Google Cloud Storage sees the objects as independent objects with no hierarchical relationship whatsoever.
  • Object Immutability. Objects are immutable, which means that an uploaded object cannot change throughout its storage lifetime. An object’s storage lifetime is the time between successful object creation (upload) and successful object deletion. In practice, this means that you cannot make incremental changes to objects, such as append operations or truncate operations. However, it is possible to overwrite objects that are stored in Google Cloud Storage because an overwrite operation is in effect a delete object operation followed immediately by an upload object operation. So a single overwrite operation simply marks the end of one immutable object’s lifetime and the beginning of a new immutable object’s lifetime.
  • Data opacity.  An object’s data component is completely opaque to Google Cloud Storage. It is just a chunk of data to Google Cloud Storage.
  • Hierarchy. Google Cloud Storage uses a flat hierarchical structure to store buckets and objects. All buckets reside in a single flat hierarchy (you can’t put buckets inside buckets),
    and all objects reside in a single flat hierarchy within a given bucket.
  • Namespace.  There is only one Google Cloud Storage namespace, which means:
    • Every bucket must have a unique name across the entire Google Cloud
      Storage namespace.
    • Object names must be unique only within a given bucket.

Google Cloud Storage Characteristics

When you store your data on Google Cloud Storage, the service does all the background work to make data operations fast so you can focus on your application. The following are the main reasons:

  • GCS is built on Google’s proprietary network and datacenter technology.  Google spent several years building proprietary infrastructure and technology to power Google’s sites (after all, fast is better than slow). When you use GCS, the same network goes to work for your data.

  • GCS replicates data to multiple data centers and serves end-user’s requests from the nearest data center that holds a copy of the data. You have a choice of regions (currently U.S. and Europe) to allow you to keep your data close to where it is most needed. Data is also replicated to different disaster zones to ensure high availability.

  • GCS takes the replication one step further. When you upload an object and mark it as cacheable (by setting the standard HTTP Cache-Control header), GCS automatically figures out how best to serve it using Google’s broad network infrastructure, including caching it closer to the end-user if possible.

  • Last but not least, you don’t have to worry about optimizing your storage layout (like you would on a physical disk), or the lookups (i.e. directory and naming structure) like you would on most file systems and some other storage services. GCS takes care of all the “file system” optimizations behind the scenes.

Performance Considerations

When you select a service, one of the most important things to consider is its performance. The performance of a cloud storage service (or any cloud service for that matter) depends on two main factors:

  • The network that moves the data between the service and the end user.

  • The performance of the storage service itself.

Network

A key performance factor is the network path between the user’s location and the cloud service provider’s data centers. This path is critical because if the network is slow or unreliable, it doesn’t really matter how fast the service  is. These are two main ways to make the network faster:

  • Serve the request from a center as close  as possible to the user’s location.

  • Optimize the network routing between the user’s location and the data center.

Storage

The other performance factor is how quickly the data center processes a user’s request. This mainly implies the following:

  • Data must be managed optimally.

  • The request must be processed as fast as possible.

In a way, a cloud storage service is similar to a big distributed file system that performs the following tasks as efficiently as possible:

  • Checks authorization.

  • Locks the object (data)  to access.

  • Reads the requested data from the physical storage medium.

  • Transfers data to the user.

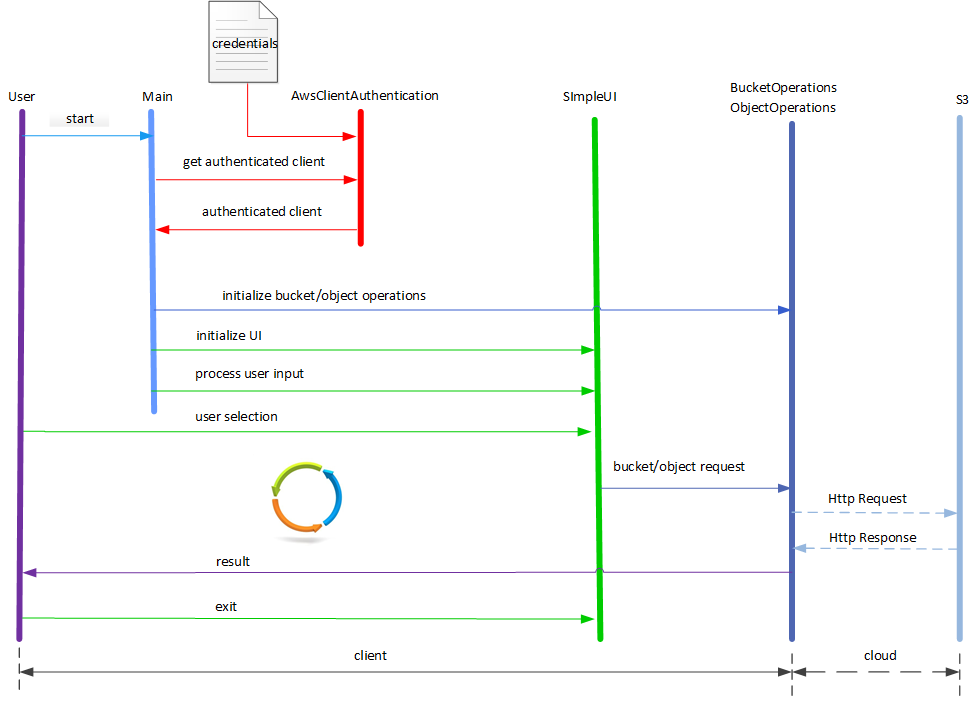
For an example of an application using GCS, see Build GCP Cloud Storage Client.