This post demonstrates how to build a Google Drive client application in Java. This command line client app shows the basic logic to interact with the Google Drive service and eliminates unnecessary clutter.
The application interacts with the Google Drive via its Drive REST API using the Google Drive Java client library. For more information, go to Google API Client Libraries then click on the Java link. In the menu bar click APIS, then enter Ctrl-F and search for drive, You will get this:

Click on the version link (v3, in the example). This will take you to the Drive API Client Library for Java. Note that at the bottom of the page in the section “Add Library to Your Project”, there are several tabs. If you click the Maven tab, you get the dependency in JSON format to add to the pom.xml file in your project. This is an example:
    <dependency>
      <groupId>com.google.apis</groupId>
      <artifactId>google-api-services-drive</artifactId>
      <version>v3-rev82-1.22.0</version>
    </dependency>
See also Putting to REST the Cloud Service APIs.
The app uses a simple UI which allows the user to perform tasks such as: list the files in a project, upload files, download files and so on.
Application Architecture
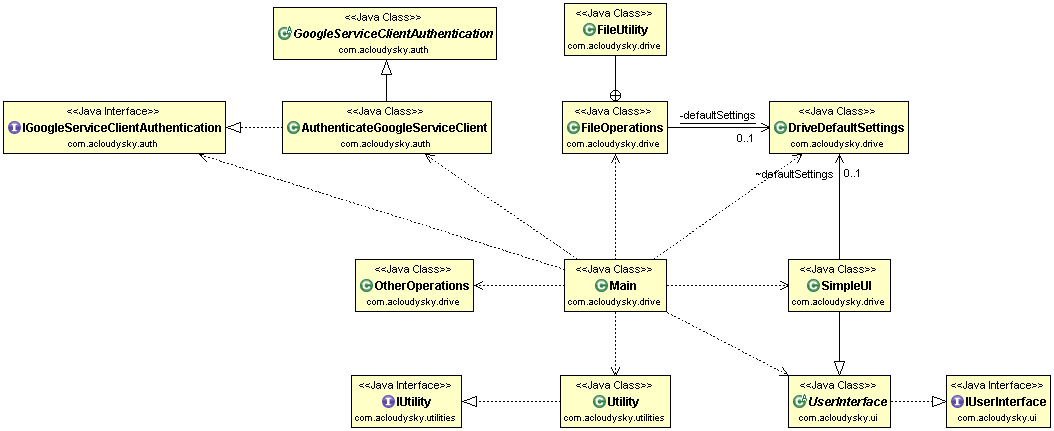
This section describes the components of the application and delegates the details to the actual code implementation.

- Main. Gets authorization to access Google Drive service. Reads the default settings. Instantiates the command classes. Delegates to the SimpleUI class the display of the selection menu and the processing of the user’s input.
- SimpleUI. Displays the menu of choices for the user can select from. It processes the
user’s input and calls the proper method based on the user’s selection. Each method calls the related Drive REST API. - FileOperations. Contains methods to perform Google Drive file operations.
The following example code shows how to list the files contained in the user’s account:/*** * Retrieve the list of user's files. * @throws IOException An I/O error has been detected. ***/ public static void listFiles() throws IOException { // Define a list to contain file objects. List&lt;File&gt; fileList = new ArrayList&lt;File&gt;(); Files.List request = authorizedDriveClient.files().list(); do { try { FileList files = request.execute(); fileList.addAll(files.getItems()); request.setPageToken(files.getNextPageToken()); } catch (IOException e) { System.out.println("An error occurred: " + e); request.setPageToken(null); } // Display files information. Utilities.displayFilesInfo(fileList); } while (request.getPageToken() != null &amp;&amp; request.getPageToken().length() &gt; 0); } - Various utilities. Used to perform routine command tasks and housekeeping.
Application Workflow
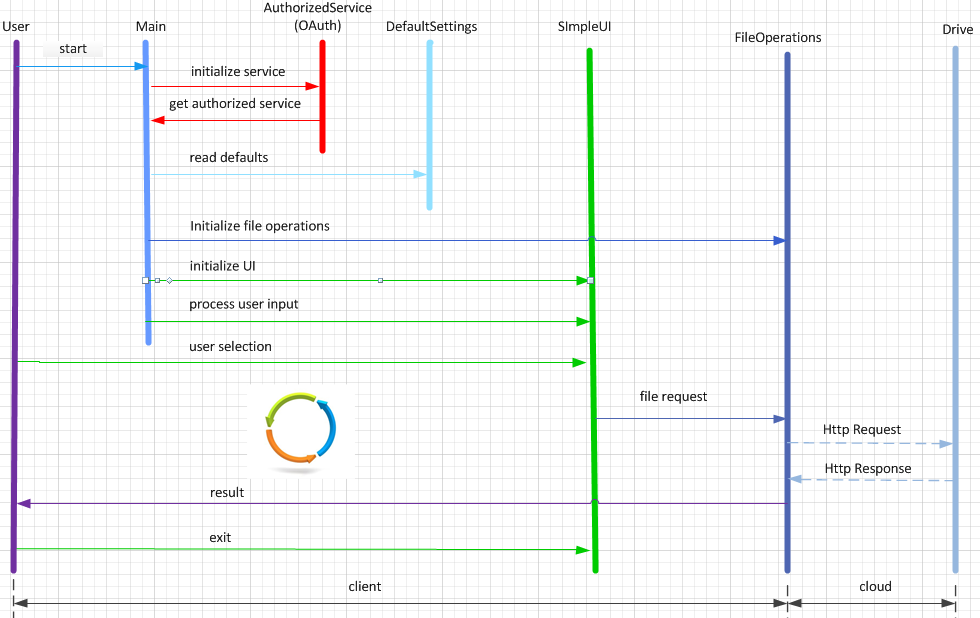
The following figure shows the application time sequence (or workflow).
The first time you start the application, the Main class performs the following actions:
- Initializes the default settings.
- Creates authorized drive service.
- Initializes the command classes
- Initializes the SimpleUI class.
- Starts the endless loop to process user inputs.
The SimpleUI class keeps processing user inputs, until the user enters the command to exit the loop. At that point, the application terminates.
Application Implementation
Enable Google Drive API
To build the application, you will use Eclipse. Before you can do that, assure that you have enabled the service API as described next.
- Follow the steps described in Enable Google Service API.
- Download the client credentials information in a file (for example, client_secrets.json). Follow the steps described in Create OAuth Client Credentials.
Create the Application Project
- In Eclipse, create a Maven project. For more information, see Create a Maven Project.
- Add reference to the authentication app JAR file created in Build GCP Service Client Authentication. Alternatively, and a for quickest results, import the downloaded project. For more information, see Import a Maven Project
Modify the pom.xml File
A key step in creating the application project is to configure the pom.xml file correctly to define the dependencies required to implement the client application. For more information see Define Dependencies in pom.xml.
That’s it. Happy googling with Google Drive.

