
This post demonstrates how to build a Google Cloud Storage Boto application which interacts with the storage service through the XML API (using the boto library). This is a simple application to help you understand the API syntax (and semantics) when interacting with Google Cloud Storage. It uses a simple interface which allows you to perform tasks such as: list the buckets in a project, list objects in a bucket, create a bucket, create an object and so on.

BotoXmlApi Application
To build the application, you will use Eclipse as shown next. Before you can perform the shown steps, assure that you have satisfied the requirements described here: Google Cloud Storage Python Applications Prerequisites.
Create the Application Project
- Activate Eclipse.
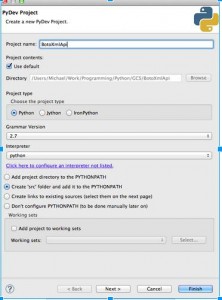
- From the File menu, select New->PyDevProject. The PyDev Project window is displayed.
- In the Project name: enter BotoXmlApi.
- Accept the user default workspace; for example: /Users/[your username]/[your work directory]/BotoXmlApi. This is the directory where the program will be stored.
- If you have more than one Python version installed perform the following steps:
- In the Grammar Version selection list select 2.7.
- In the Interpreter selection list select the desired Python interpreter. For more information, see Configure PyDev.
PyDev Project
- Click Finish. The BotoXmlApi project is created and displayed in the Package Explorer.
- If the PyDev perspective is not selected yet, click on the Open Perspective
icon in the upper right corner of Eclipse. From the pop-up menu select PyDev and click OK.
- In the Package Explorer, expand the BotoXmlApi project node.
- Right-click the src folder.
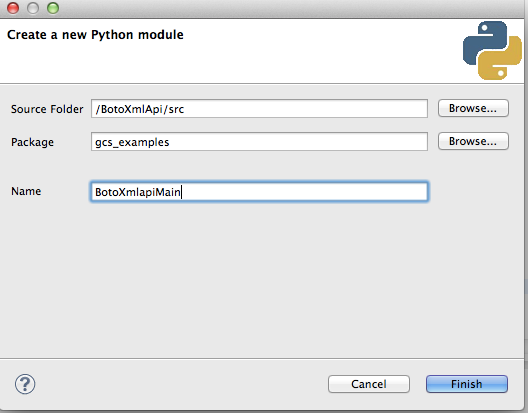
- Select New->PyDev Module.
- In the pop-up dialog window enter the following information:
- In the Package box enter gcs_examples.
- In the Name box enter BotoXmlApiMain.

PyDev Module
- Click Finish.
- Select Module Main and click OK.
An empty BotoXmlApiMain.py is created. Actually the module contains the standard Python check for main because the template chosen. You’ll enter the code needed to interact with Google Cloud Storage in the next sections. But before you do that you must configure the project to access some needed external libraries.

Configure External Libraries
To build the BotoXmlApi application you need to configure the required libraries. These libraries are contained in the gsutil folder that you obtained when installing the gsutil tool. For more information, see Install gsutil Tool.
- For convenience, create a string substitution variable which point to the gsutil directory, as follows:
- In the Package Explorer, right-click on BotoXmlApi project name.
- In the displayed selection window, click Properties. The Properties for BotoXmlApi window is displayed.
- In the left pane, click PyDev-PYTONPATH.
- In the right pane, click String Substitution Variables button.
- Click the Add Variable tab. A dialog window is displayed. Perform the following steps:
- In the Name box enter gsutildir.
- In the Value box enter the path to the gsutil folder. Click the Browse button and select the VERSION file in the gsutil directory. Then delete VERSION in the path and keep the rest.
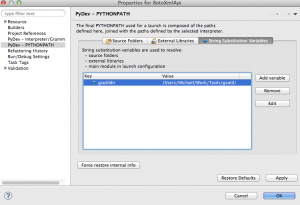
{gsutildir} variable
- Click OK.
- Click the External Libraries tab.
- Click Add based on variable button.
- Add a reference to the boto library by entering ${gsutildir}third_party/boto.
- Repeat step 3 and 4 to add the rest of the libraries as shown in the following picture. Click the picture to enlarge it.

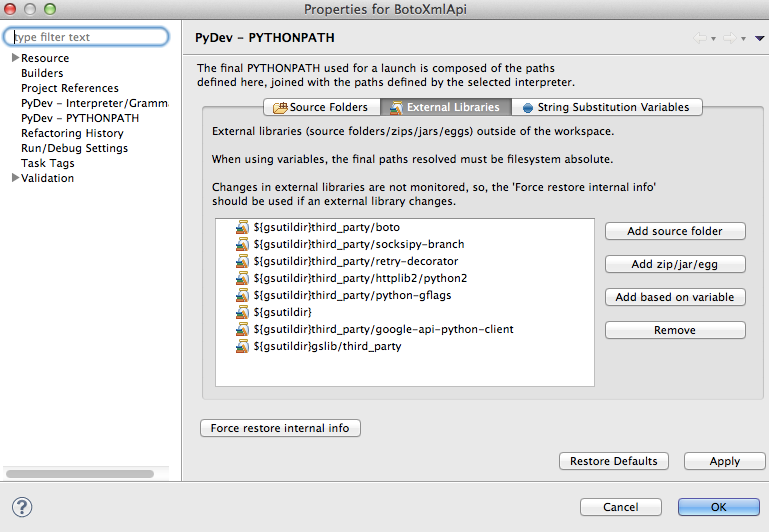
External Libraries
BotoXmlApi Implementation
Finally, let’s get our hands dirty and dig into the actual code.
The best way to do this is to:
- Download the code here: storage-xmlapi-python.
- Copy and paste the various modules in your project.
The application contains the following modules:
- BotoXmlApiMain.py. It contains the main function which is called when the application is executed. Provides a simple user interface to exercise Google Cloud Storage XML API.
- Project.py. It contains the functions to perform project wide operations.
- Buckets.py. It contains the functions to perform bucket operations in the specified project.
- Objects.py. It contains the functions to perform object operations in the specified project.
Before running the application, study the code and read the comments to get familiar with the application functionality and the way it is built.
Run the Application in Eclipse
- In the Package Explorer right-click BotoXmlApiMain.py.
- In the popup window select Run As-> Run Configurations. The Run Configurations window is displayed.
- In the Run Configurations window click the Arguments tab.
- In the Program arguments box enter the following arguments:
- –proiect_id [your Google Cloud Storage project ID].
- –bucket_name [name of your bucket].
- –object_name [name of your object].
- –debug_level [0|1|2] message debug level. If this argument is
missing, the default value of zero (no messages) is used.
- Click the Apply button.
- In the Package Explorer, right-click BotoXmlApiMain.py.
- In the popup window select Run As->Python Run.
- In the Eclipse console window enter p1. This display the
buckets in the specified project. - Clear the output by entering any key.
- Select any entry from the menu such as b1 to list the objects
in the specified bucket. - Clear the output by entering any key.
- Make other selections from the menu to exercise the XML API.
- Enter x to exit the application.
Run the Application from the Command Line
To run the application from the command line you must configure your environment properly. Remember that you are going to leverage the libraries that came with the gsutil tool. For more information, see Install gsutil Tool.
Perform these steps:
- Include gsutil, boto, and third_party libraries in your PYTONPATH by adding this line to the .bash_profile file:
export PYTHONPATH=${PYTHONPATH}:${TOOLS}/gsutil:${TOOLS}/gsutil/third_party/boto:${TOOLS}/gsutil/gslibReplace ${TOOLS} with the directory where you installed gsutil (by default it is ${HOME}). For example, add this in your .bash_profile: TOOLS=”/Users/[username]/Tools”. Replace username with an applicable value.
- If you do not have virtualenv installed, from a Terminal window, install it as follows: pip install virtualenv.
- Create (optional) a directory where to keep your virtual environments, for example:
mkdir Work/Programming/Python/BotoEnv. - Create the virtual environment, for example:
virtualenv Work/Programming/Python/BotoEnv/BotoXmlApi - Switch to the virtual environment directory, for example:
cd Work/Programming/Python/BotoEnv/BotoXmlApi. - Activate the virtual environment as follows: virtualenv activate.
- Perform the following installs which allow the application to reference the needed libraries:
sudo pip install ${TOOLS}/gsutil/third_party/python-gflags pip install ${TOOLS}/gsutil/third_party/socksipy-branch pip install ${TOOLS}/gsutil/third_party/httplib2 pip install ${TOOLS}/gsutil/third_party/retry-decorator pip install ${TOOLS}/gsutil/third_party/google-api-python-client - Copy all the Python modules (BotoXmlApi.py, Project.py, Buckets.py, Objects.py, Playpen.py) in your virtual environment directory.
- At the Terminal command prompt enter the following:
python BotoXmlApiMain.py --project_id [project ID] --bucket_name [bucket name] --object_name [object name] --debug_level [0|1|2]Replace the arguments with your values.
This displays the application menu which allows you to exercise the desired API.
Have Fun!!